Mom's Dinner

  • Home
  • All Recipes
  • Instant Pot
    • All Instant Pot Recipes
    • Instant Pot Soup
    • Instant Pot Beef
    • Instant Pot Chicken
    • Instant Pot Pork
    • Instant Pot Turkey
    • Instant Pot Pasta
    • Instant Pot Vegetarian
  • Dinner
    • Beef
    • Chicken
    • Pork
    • Turkey
    • Fish & Seafood
    • Mexican
    • Pasta
    • Vegetarian
  • Subscribe
menu icon
go to homepage
  • RECIPES
  • DINNER
  • ABOUT
  • SUBSCRIBE

subscribe
search icon
Homepage link
  • RECIPES
  • DINNER
  • ABOUT
  • SUBSCRIBE

×
You are here: Home

Instant Pot Country Style Ribs

August 17, 2019 by Susie Weinrich 172 Comments

a plate of Instant Pot Country Style Ribs

I tested these Instant Pot Boneless Pork Ribs a countless number of times to get them just right, which is "fall-apart tender". I found that buying the right boneless country style ribs is the first step to making them super tender (read on to find out more). Once you have that down, this recipe adds all the flavor you could possibly need! They have been made thousands of time and have over 75 five star reviews.

Instant Pot Boneless Pork Ribs on a white plate with an electric pressure cooker in the background

No Instant Pot, no problem… we have cooked up SO MANY boneless ribs that we also have a great method for making them in the oven. You can check out this Oven Baked Boneless Ribs Recipe next time you are without your Instant Pot.

This is definitely an easy, short-cut way to make ribs. So if you are looking for a rib recipe that will sit on a smoker or grill all day, this is not it. But I will direct you to this Competition Style Smoked Rib recipe if that is what you are looking for.

[feast_advanced_jump_to]

Country Style Pork Ribs (Instant Pot) Ingredients

  • Boneless Country Style Ribs – Despite the name these are not actually ribs, they are cut from the shoulder portion. But there are a few things that you want to get right when picking a country style rib; pick ones that are dark pink or reddish in color, slightly marbled or have some fat content.
  • Homemade Dry Rub – this is a really simple mix of brown sugar, garlic powder, onion powder, smoked paprika, kosher salt, and black pepper. I bet you have most of these ingredients in your spice cabinet. If you happen to have a bbq dry rub that you love, you can opt for that in it's place.
  • Worcestershire Sauce – Adds a layer of flavor to the cooking liquid.
  • Apple Cider Vinegar – Also adds a layer of flavor to the cooking liquid.
  • Garlic Cloves – lightly infuses the boneless ribs with a garlic flavor during cooking.
  • BBQ Sauce – use your favorite BBQ sauce or Homemade BBQ Sauce to finish the Country Ribs.

Recommended Equipment

With this recipe you will be using your Instant Pot (aka- electric pressure cooker), which is great if you do not want to turn on your oven and heat up the house during the summer.

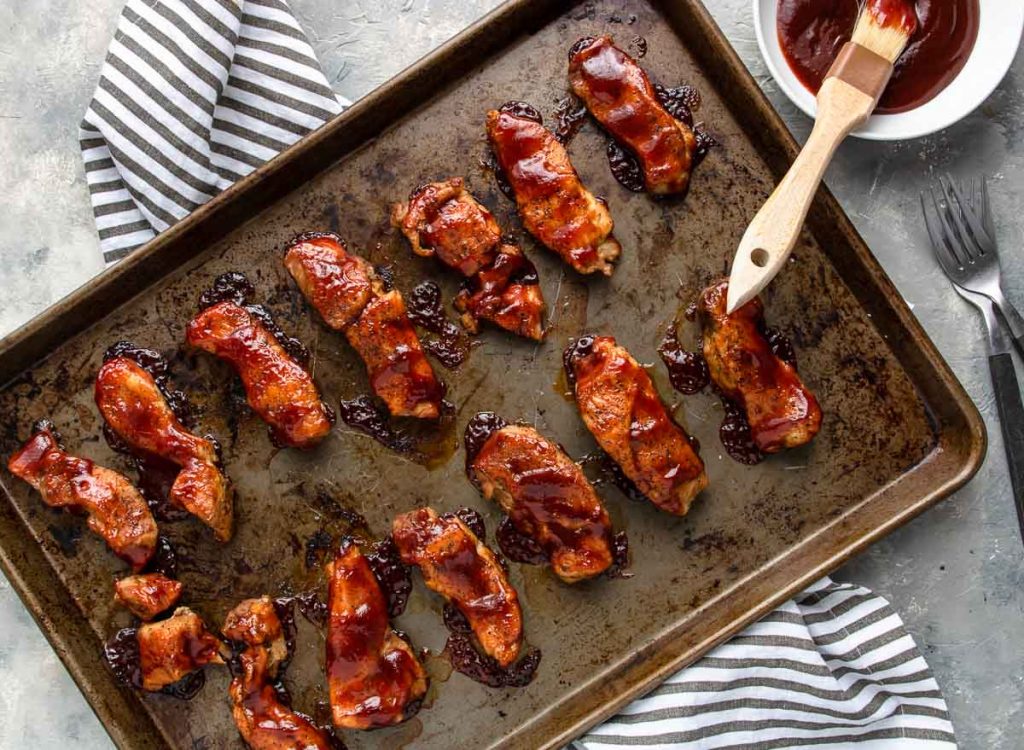
country style boneless pork ribs coated with bbq sauce on a sheet pan

We use two different Instant Pots, both are 6 quarts.

  • 7-in-1 Duo Plus Instant Pot
  • 9-in-1 Duo Plus 6 quart Instant Pot
country style ribs baked and coated in bbq sauce

Oven Baked Country Style Ribs

If you don’t have an Instant Pot you can also make Boneless Country Style Ribs in the oven

Get the recipe →

What Are Country Style Ribs?

Pork Ribs, spare ribs, baby back ribs, and beef ribs- all delish, but, here we are using boneless country style ribs. Which is basically a long strip on pork loin meat that can have a bone attached or not. For this recipe you will use the boneless version.

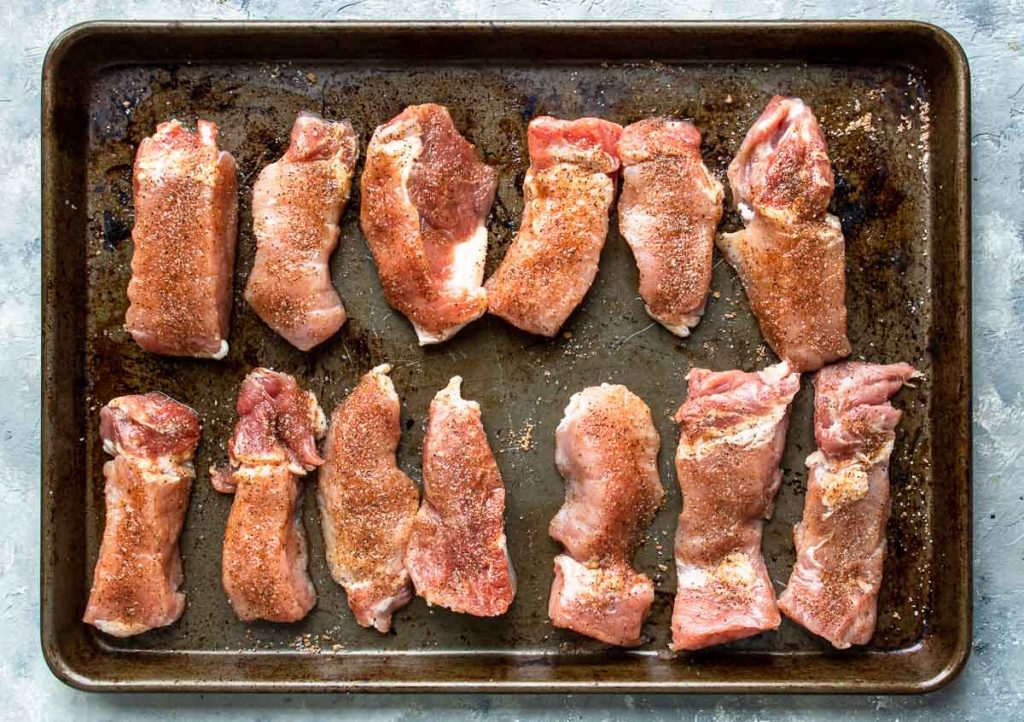
Boneless country style ribs on a sheet pan seasoned with a dry rub

When you buy them in the store they may be called Boneless Country Style Ribs or Pork Loin Country Style Ribs. There is another “rib” called a Western Rib that is actually cut from the shoulder and is not a rib at all, I would not recommend buying this cut for this recipe.

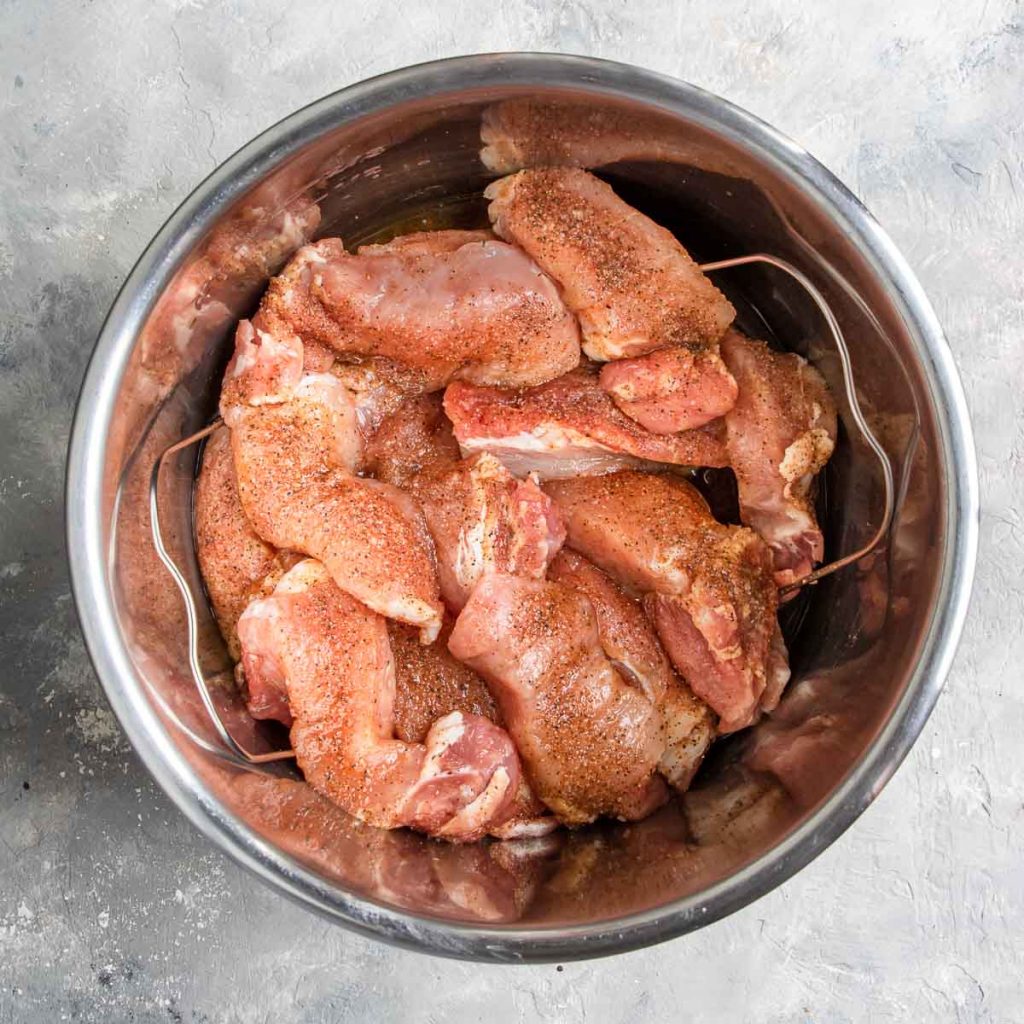
Country style ribs coated in seasoning and in the Instant Pot

Usually when you buy Boneless Pork Ribs they are cut into strips. However, I have bought them where they are scored and still pull out of the package in one piece. If they are only scored, cut them all the way through so you have individual “ribs”. You will want them to be roughly 5 inches long and 1 ½ inches wide.

Tips for Buying Boneless Pork Ribs

You will want to make sure you look for boneless country style ribs that are dark pink or reddish in color, slightly marbled or have some fat content. Those are the ones that will cook up “fall-apart tender”. The ones that look light pink with no fat at all can tend to dry out no matter how you cook them.

dark pink or dark reddish boneless country style ribs

Serving Suggestions for Instant Pot Boneless Pork Ribs for Dinner

Of course these pork ribs are delicious as is- with a side of Homemade Mac & Cheese, Jiffy Corn Casserole, Best Ever Cornbread, potato salad, broccoli bacon salad, Raspberry Jello Salad, and/or Cheesy Potato Casserole . And if you are entertaining and need a BBQ worthy dessert check out these options:

  • Summer Berry Cobbler
  • Chocolate Sheet Cake with Chocolate Frosting
  • Cookies & Cream Key Lime Ice Cream
  • Apple Pie Bars
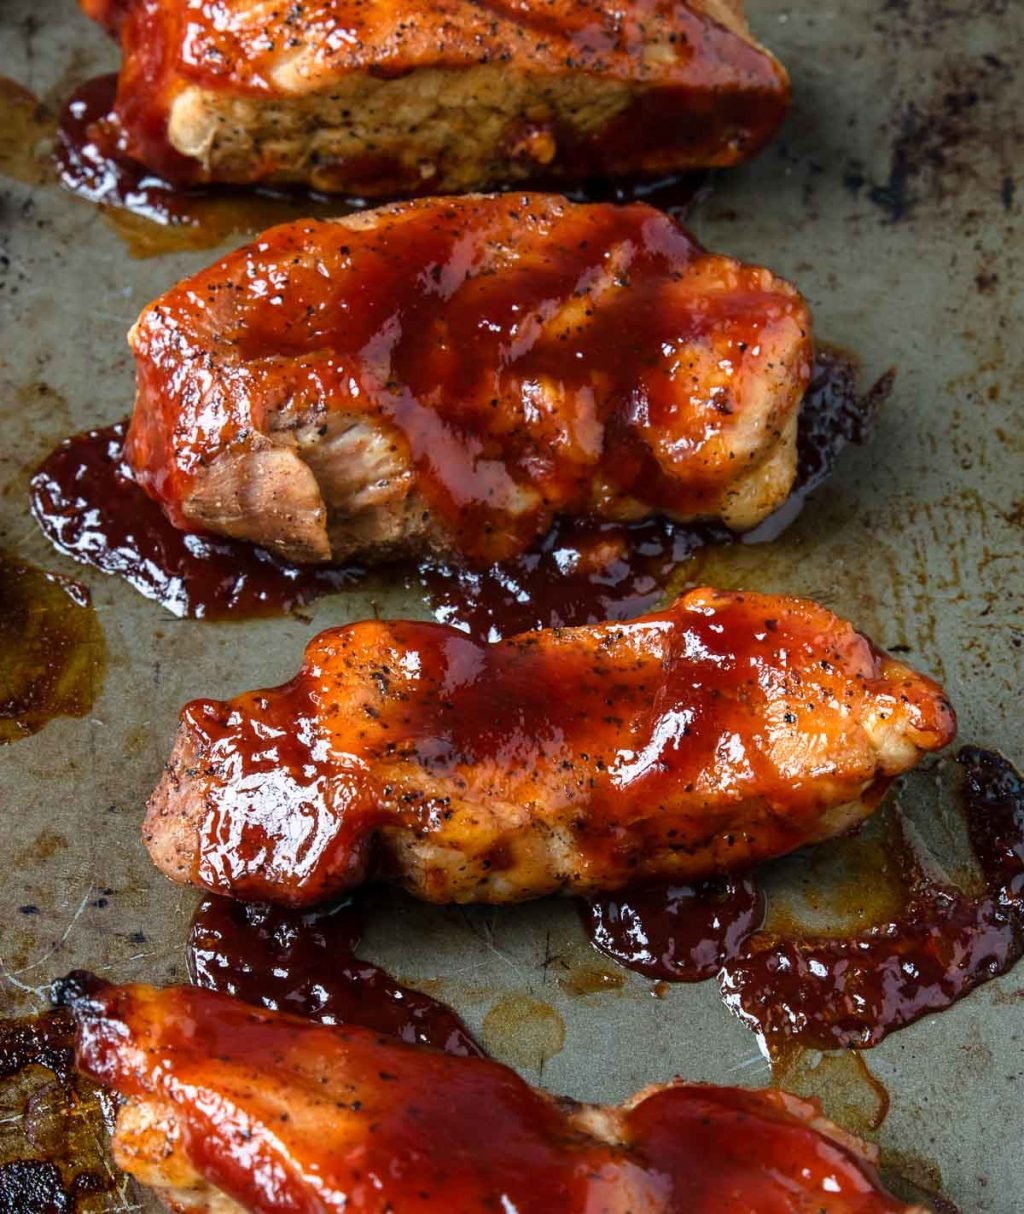
up close photo of boneless pork ribs coated with bbq sauce

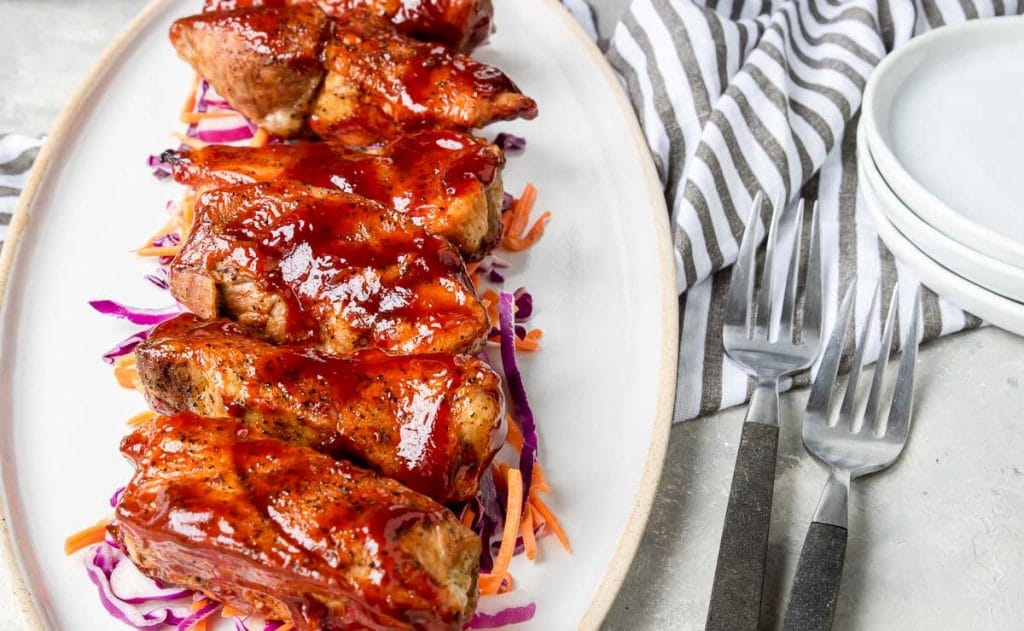
Since these Instant Pot ribs are boneless they also make an AMAZING Rib Sandwich. Put 2 or 3 ribs on a substantial bun, add some extra bbq sauce, pickles, and a pile of coleslaw. Mouth. Watering.

Instant Pot Country Style Ribs coated with bbq sauce on a white plate over coleslaw

I hope you give this Boneless Pork Rib Recipe a try in your Instant Pot!

Love- Susie

More Pork Recipes

  • country style ribs baked and coated in bbq sauce
    Tender Oven Baked Country Style Ribs
  • bbq rubbed pork tenderloin on a cutting board
    Grilled Pork Tenderloin (with homemade BBQ sauce)
  • grilled pork burger with lettuce, onion, tomato on a bun
    Ground Pork Burgers
  • Instant Pot pulled pork in a white bowl
    Instant Pot Pulled Pork

Susie leaning on the kitchen counter

WATCH SUSIE ON FOOD NETWORK!

⭐⭐⭐⭐⭐

The new gameshow, 100 Cooks, premieres on Food Network June 7th, 2026 at 9est/8cst. I hope you will tune in!

a plate of Instant Pot Country Style Ribs

Boneless Pork Ribs (Instant Pot Recipe)

Country Style Boneless Ribs are cooked to tender perfection in your electric pressure cooker. You then finish them in the oven to get the caramelized bbq sauce that is finger lickin' good!
4.81 from 101 votes
Print Pin Rate Save Saved!
Prep Time: 10 minutes minutes
Cook Time: 30 minutes minutes
Servings: 4 people
Author: Susie Weinrich

Equipment

  • Electric Pressure Cooker

Ingredients

  • 2 – 2.5 lbs. Fresh boneless country style ribs - look for more marbled boneless ribs, see notes. (can use frozen, however see the notes below)
  • 1 Tbsp brown sugar
  • 2 teaspoon kosher salt
  • 1 teaspoon black pepper
  • ½ teaspoon each: garlic powder & onion powder
  • ¼ teaspoon smoked paprika
  • cayenne pepper is optional for heat
  • 1 cups water
  • 2 tablespoon Worcestershire sauce
  • 1 ½ tablespoon cider vinegar
  • 3 whole garlic cloves - crushed
  • BBQ Sauce - your favorite brand/flavor or Homemade

Instructions
 

  • Lay the country style ribs out on a sheet pan.
    2 – 2.5 lbs. Fresh boneless country style ribs
  • In a small bowl mix together the brown sugar, kosher salt, black pepper, garlic powder, onion powder, smoked paprika (and optional cayenne pepper). Stir well until there are no large clumps remaining.
    1 Tbsp brown sugar, 2 tsp kosher salt, 1 tsp black pepper , ½ tsp each: garlic powder & onion powder , ¼ tsp smoked paprika, cayenne pepper is optional for heat
  • Sprinkle the salt & seasoning rub mixture on the ribs, coating both sides and pressing it in so it sticks.
  • Pour the water, Worcestershire, and cider vinegar into the Instant Pot. Crush the garlic cloves and pop them into the liquid in the pot.
    1 cups water, 2 Tbsp Worcestershire sauce , 1 ½ Tbsp cider vinegar, 3 whole garlic cloves
  • Place the seasoned boneless ribs in the pot.
  • Put the lid on and lock it in place. Turn the pressure valve to seal. Set the Instant Pot to cook on high pressure Meat/Stew mode for 18 minutes.
    At the end of 18 minutes do a natural release of pressure for 5 minutes, then finish with a quick release.
    NOTE- While the pressure is releasing PREHEAT THE OVEN TO BROIL.
  • Place the cooked ribs on a sheet pan and coat one side with desired amount of your favorite BBQ sauce. Broil in the oven for 4-5 minutes.
    Remove the ribs from the oven, flip them to the other side, coat with BBQ sauce. Place back in the oven for 3-4 minutes.
  • Enjoy your tender Instant Pot Boneless Country Style Ribs!!

Recipe Tips and Notes:

COUNTRY STYLE BONELESS RIBS: when you are buying these types of “ribs” in the grocery store it is very important you purchase ones that look dark pink or even reddish, slightly marbled or have a little fat content. Ones that are completely light pink with no marbling are doomed to be dry no matter how you cook them.
dark pink or dark reddish boneless country style ribs
These can be made ahead and reheated. I recommend cooking them in the Instant Pot, letting them cool, and refrigerating for up to 3 days. Then follow the broiling instructions with the BBQ sauce to reheat. However- they will not be as tender when made ahead!
I have made these Instant Pot Pork Ribs from frozen as well. Simply up the Instant Pot cooking time to 25 minutes with a 10 minute natural release. NOTE: they will not be as “fall apart” tender as they are from fresh.  
I have not tested this recipe with bone-in country style ribs, but the cooking time and method should be the same as the recipe is written.
Did you make this recipe?Connect with me and let me know by commenting below!
Jump to Comments

More recipes you will love

  • Enchilada Bake Recipe
  • Basil Walnut Pesto
  • Easy Group Meals
  • Asian Inspired Salmon
  • How to Make a Brown Gravy
  • Saltine Toffee Recipe
  • Enchiritos Recipe
  • Brown Mushroom Gravy
  • Seasoned Oyster Cracker Recipe
  • Easy Deviled Eggs
  • Barley Soup Instant Pot
  • Beef Chuck Roast Instant Pot
  • Cooking Spiral Ham
  • Meatballs with Italian Sausage and Ground Beef
  • Recipe for Chicken and Biscuits
  • Asian Salmon Marinade
  • Traditional Swedish Meatballs
  • Christmas Fruit Cookies

Easy Berry Cobbler Recipe

July 8, 2019 by Susie Weinrich 9 Comments

an oval dish with berry cobbler and two scoops of ice cream. two spoons sticking out of the side

About 15 years ago I cut a recipe for a peach cobbler out of a newspaper and have been making it ever since. It was a strange recipe where the batter goes on the bottom and the fruit on top, while it cooks the batter rises to the top and the peaches sink to the bottom. Over the years I have tweaked this recipe and it has now become a Summer Berry Cobbler that my whole family loves.

Berry cobbler with vanilla cake like topping and topped with two scoops of vanilla ice cream

It is a cobbler full of fresh strawberries, blueberries, and raspberries. The warm berries are so delicious and the sweet syrupy juice they render during cooking is so rich in flavor.  The topping is a light sweet vanilla cake which makes it a great summer dessert. When you add a little ice cream or fresh whipped cream this Mixed Berry Cobbler is perfection. It is definitely a company worthy dessert!

One of the best things about summertime is the abundance of all the fresh fruits, berries, and veggies. I live in the midwest so this bounty only lasts about 4 months – and I take advantage of every last minute!

Mixed Berry Cobbler

I am sure that when you have made cobbler or crumbles in the past you have placed the fruit filling on the bottom and then topped it with the oat crumble or the biscuit topping. Me too!

However, in this clever recipe the batter goes on the bottom and the fruit is placed on top, then during the cooking the batter rises above the fruit and bakes into the most delicious vanilla cake topping. 

Fruit Cobbler with a slice taken out so you can see the cooked mixed berries

I found this dessert recipe (originally peach cobbler) in a newspaper about 15 years ago… cut it out and saved it in my recipe box. I wish I knew where it was from so I could give a shout out to whoever came up with this method of putting the batter on the bottom and the filling on top. It is completely counterintuitive, but it works every single time!

Don’t be tempted to stir the mixture together in the pan. Leave all the ingredients separate (butter, batter, and fruit)- it works – I promise! The batter rises to the top during cooking and gets all sorts of buttery, sugary sweet, and delicious!

How to Make Berry Cobbler

Wash all the berries and prep the strawberries by cutting them into quarters.

In a mixing bowl, whisk together 1 cup flour, 1 cup sugar, 1 cup milk, and 1 tablespoon baking soda, just until it comes together.

Baking Pan: you can make this dessert in a 9x13x2 baking pan, or I like to use one of my casserole dishes that is just slightly smaller (around 8x12x2), this yields a thicker berry and cake layer. However, if you go any smaller than 8×12, the dish will boil over the edge of the pan in the oven!

summer berries- blueberries, strawberries, raspberries

Step 1

In a saucepan simmer all the berries, ½ cup sugar, and 1 tablespoon of lemon juice over medium heat for 5 minutes. Delicately stir them once in awhile so the sugar does not burn. Set them aside.

step one: melted butter in the bottom of a casserole pan

Step 2

Pour melted butter in the bottom of your 2 quart pan.

Step 2: the batter is poured on top of the butter

Step 3

Pour the mixed batter over the butter. DO NOT STIR

Step 3- the mixed berries are poured on top of the butter and batter

Step 4

Pour the simmered berries over the mixture. DO NOT STIR

Berry Cobbler baked with the vanilla cake on top

Step 5

Bake at 375°F for 30-35 minutes until the top is golden and set.

Serving

I recommend letting the berry cobbler sit at room temp for 20-30 minutes to cool and to let the berries thicken slightly. Then serve with ice cream or whipped cream. 

Storing

It is likely that you will not have any Berry Cobbler leftover and you will not have to worry about storing. I have stored mine, covered, at room temp for a day (no longer than that), like you would a pie. However, if it is going to be longer than that, I recommend storing your cobbler, covered, in the fridge for up to 4 days.

vARIATIONS

In this mixed berry dessert I like to use the combo of strawberries, blueberries and raspberries. However, you can always change it up to fit your taste. Blackberries and blueberries could be a super delicious combo. Strawberry and rhubarb would be another combo I think I would love. I have also had this cobbler using peaches (the original recipe) and it is wonderful!

mixed berry cobbler with two spoons and two scoops of vanilla ice cream

Really, you can try any fruit that sounds good and is in season.

Whatever combo you choose don’t forget the ice cream or whipped cream and enjoy every last bite!

Berry Cobbler FAQ’s

What is the difference between a cobbler and crumble?

A cobbler has a soft, biscuit-style topping that's dropped or spread over the fruit. As it bakes, it puffs up and turns golden on top while staying tender underneath.
A crumble has a streusel-like topping made with butter, sugar, and flour (sometimes oats). Instead of puffing up, it bakes into a crisp, crumbly layer on top of the fruit.

What is the secret to a good cobbler?

Well, depending who you ask you will get a different answer to this. But IMO, a good cobbler has just the right amount of sugar added to the fruit to keep it sweet but not sickly sweet, the addition of a little lemon juice to brighten things up, and the perfect ratio of cobbler/cake to fruit is essential.

More Fruit Desserts

  • A hand dipping a strawberry into marshmallow fruit dip
    Marshmallow Fruit Dip with Fluff
  • Frozen fruit cups with with a spoon
    Grandma’s Frozen Fruit Cups
  • Finished Berry Cheesecake Trifle with garnishes on top
    Fruit & Berry Cheesecake Trifle
  • a pan of blueberry crumble with a spoonful taken out.
    Blueberry Crumble

Susie leaning on the kitchen counter

WATCH SUSIE ON FOOD NETWORK!

⭐⭐⭐⭐⭐

The new gameshow, 100 Cooks, premieres on Food Network June 7th, 2026 at 9est/8cst. I hope you will tune in!

an oval dish with berry cobbler and two scoops of ice cream. two spoons sticking out of the side

Triple Berry Cobbler

A delicious Mixed Berry Cobbler full of: blueberries, raspberries and strawberries. This cobbler dessert is topped with a delicate vanilla cake. Just add some vanilla ice cream of whipped cream for an amazing dessert!
5 from 3 votes
Print Pin Rate Save Saved!
Prep Time: 15 minutes minutes
Cook Time: 30 minutes minutes
Resting Time: 30 minutes minutes
Servings: 6 -8 servings
Calories: 482kcal
Author: Susie Weinrich

Ingredients

Fruit

  • 2 cups fresh strawberries - quartered
  • 1 ½ cups fresh blueberries
  • 1 cup raspberries
  • 1 T fresh squeezed lemon juice
  • ½ cup sugar
  • 1 Tbsp cornstarch

Cobbler Topping

  • 1 cup flour
  • 1 cup sugar
  • 1 T baking powder
  • ¼ t salt
  • 1 cup milk

Assembly

  • ½ cup butter - melted

Instructions
 

Prep

  • Preheat the oven to 375℉.
  • In a large pot, over medium heat, combine the strawberries, blueberries, raspberries, lemon juice, cornstarch and ½ cup sugar. Simmer for 5 minutes, stirring occasionally and delicately. Set aside.
    2 cups fresh strawberries, 1 ½ cups fresh blueberries, 1 cup raspberries, 1 T fresh squeezed lemon juice, 1 Tbsp cornstarch, ½ cup sugar
  • In a mixing bowl add the flour, 1 cup sugar, baking powder and salt- whisk until combined. Add the milk and whisk just until it comes together- do not over whisk. Set aside.
    1 cup flour, 1 cup sugar, 1 T baking powder, ¼ t salt, 1 cup milk
  • In a separate bowl, melt the butter.
    ½ cup butter

Assembly

  • Pour the melted butter into your baking pan .
    step one: melted butter in the bottom of a casserole pan
  • Pour the mixed batter on top of the butter – DO NOT STIR!
    Step 2: the batter is poured on top of the butter
  • Carefully pour the berry mixture on top of the batter- DO NOT STIR!
    Step 3- the mixed berries are poured on top of the butter and batter

Bake

  • Bake for 30-35 minutes until the batter has risen to the top and is golden brown and the berries are bubbling and are thick and syrupy.
    Berry Cobbler baked with the vanilla cake on top
  • Let the berry cobbler sit at room temp. for 30 minutes to cool before serving, this will also allow the berry mixture to thicken slightly.
  • Enjoy with some vanilla ice cream or whipped cream.

Recipe Tips and Notes:

BAKING PAN: You can make this cobbler dessert in a 9x13x2 baking dish. 
I like to make mine in a slightly smaller oval casserole baking dish. It is around 8x12x2. This yields a thicker layer of berries and cake.
Warning: If you go any smaller than an 8x12x2 the cake and berries will spill over the edge of your baking pan, unless it is deeper than 2 inches.  
Did you make this recipe?Connect with me and let me know by commenting below!
Jump to Comments
Serving: 1serving | Calories: 482kcal | Carbohydrates: 81g | Protein: 4g | Fat: 17g | Saturated Fat: 11g | Polyunsaturated Fat: 1g | Monounsaturated Fat: 4g | Trans Fat: 1g | Cholesterol: 46mg | Sodium: 448mg | Potassium: 224mg | Fiber: 4g | Sugar: 59g | Vitamin A: 571IU | Vitamin C: 38mg | Calcium: 191mg | Iron: 2mg

Healthy Mexican Chicken and Rice Casserole

May 6, 2019 by Susie Weinrich 10 Comments

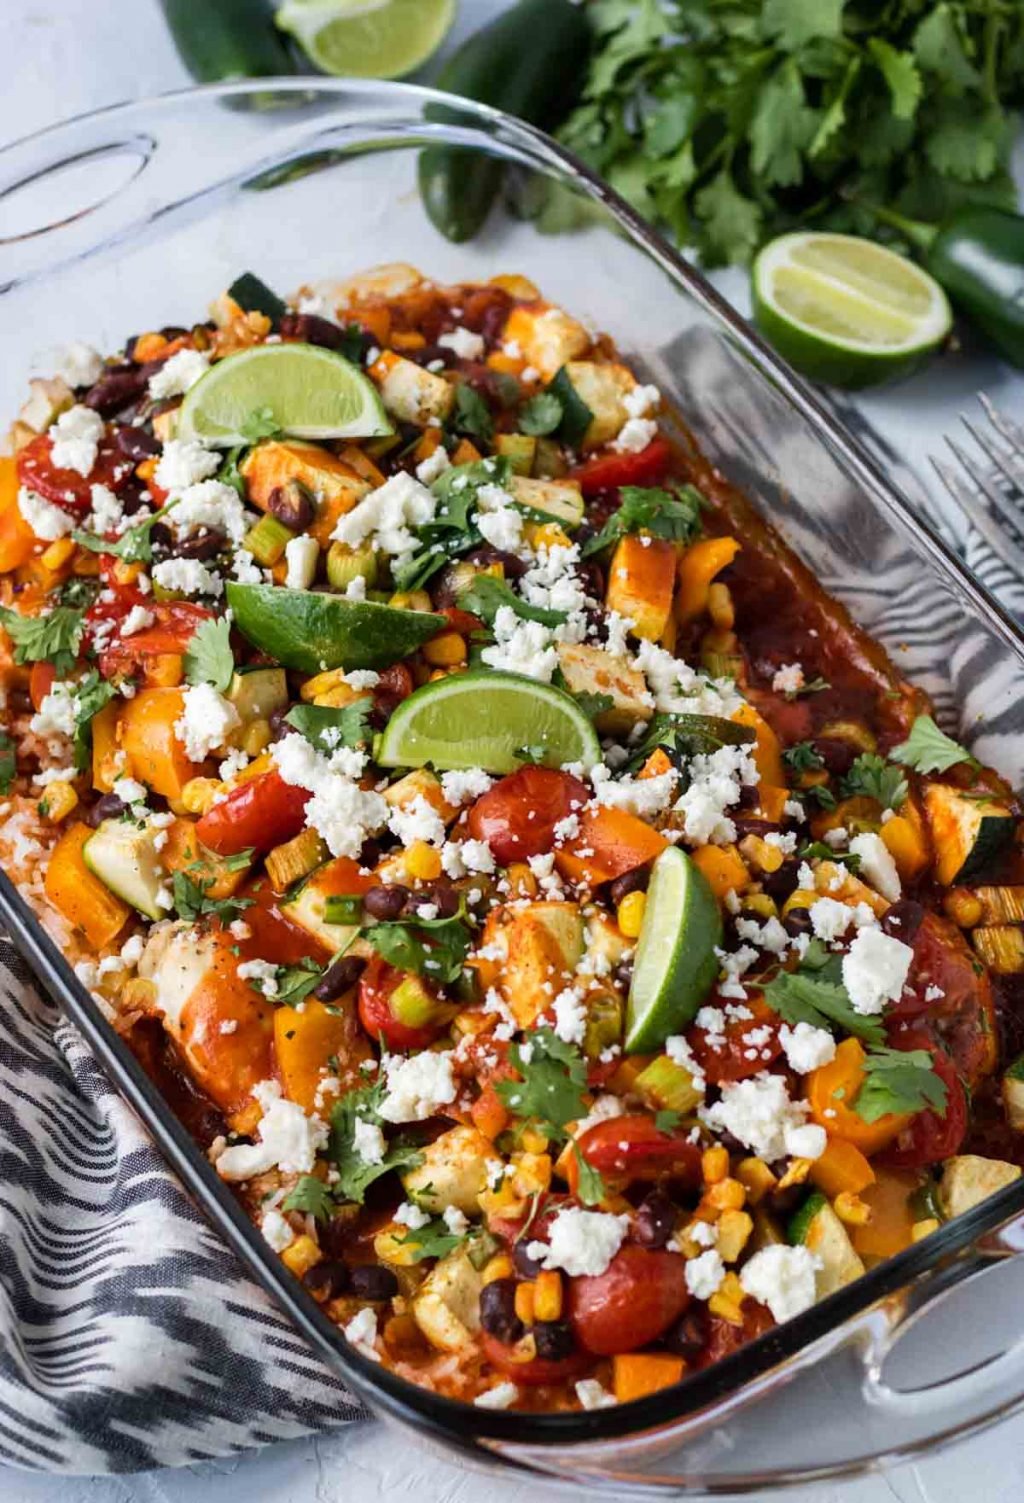
Mexican Chicken and Rice Casserole

A Healthy Mexican Chicken Casserole that is full of lean protein, plenty of veggies, and tons of flavor! Not only is this Mexican dinner delicious, it is an all-in-one dinner recipe, everything is cooked together in one pan- including the rice. 

Healthy Mexican Casserole in a glass baking dish topped with queso fresco and limes
[Read more…]

Simple Mexican Dinner Recipes for Cinco De Mayo

April 26, 2019 by Susie Weinrich 11 Comments

A taco dinner party table from above, hands reaching over the table

I will always be in the mood for Mexican food! It is the cuisine that has all my favorite flavors and dishes- enchiladas, salsa, burritos, tacos, margaritas, and tequila… just to name a few. All delicious!

a picture of four mexican recipes - margarita, tacos, pico de gallo and guacamole

If you love Mexican food for dinner, like I do, then this post is for you. All the Mexican style recipes you need for a great Cinco De Mayo dinner.

RELATED: How To Create A Taco Bar & How to Make A Salsa Bar At Home

Traditional Mexican Drinks

Nothing will start your party better than some great Margaritas on the Rocks! Make it with some Jalapeno Infused Tequila for a little kick.

But really any tequila based cocktail will pair perfectly with all the dishes you prepare.

a salt rimmed glass with a classic margarita garnished with a lime

If you have some guests that would prefer a virgin cocktail, check out this Margarita Mocktail, they will be delighted.

Here are some of our other favorite Mexican Style Cocktails:

  • hot honey margarita in a short glass with a salt rim and red pepper flakes on the tables with hot honey in a jar in the background
    Deliciosa Hot Honey Margarita
  • Michelada in a tall glass with Tajin on the rim of the glass
    Michelada
  • Añejo Tequila Smash in a glass with a lemon in the glass and fresh mint on top
    Añejo Tequila Smash Cocktail
  • two grapefruit palomas with a bottle of grapefruit soda and silver tequila in the back
    Traditional Paloma
  • ranch Water cocktail in a mason jar with a bottle of Topo Chico
    Authentic Ranch Water
  • blended pineapple margarita in a glass with fresh pineapple and lime zest on top
    Perfect Frozen Pineapple Margarita

Simple Mexican Appetizer Recipe

It doesn’t get more traditional than chips and salsa as an appetizer for a Mexican Dinner. I have created an easy salsa recipe that is full of delicious flavors. Blend together tomatoes, garlic, onions, cilantro, lime, salt, and a touch of sugar. It is perfect with salty tortilla chips!

homemade salsa in a bowl with cilantro and limes

Also check out these other salsa and dip recipes:

  • two hands serving a bowl of Pico de Gallo
    Simple Pico de Gallo
  • tomatillo salsa in a bowl with tortilla chips to the side
    Tomatillo Salsa -No Roasting Required!
  • corn salsa in a bowl with chips to the side
    Corn Salsa; Better Than Chipotle
  • green salsa with avocado in a bowl with tomatoes and chips to the side
    Creamy Avocado Salsa
  • a bowl of grilled tomatillo salsa
    Grilled Tomatillo Salsa
  • a bowl of fresh avocado guacamole with a chip dipping in
    Holy Guacamole, That’s Good Guac

Easy Mexican Dinner Entrée Recipes

It is not just a name, this really is my favorite Chicken Enchilada recipe! This is a Mexican dinner entrée that is easy to make and super delicious. A great crowd pleaser.

chicken enchiladas in a pan

Some other enchilada recipes to check out:

  • a pan of baked Chicken Enchilada Suiza garnished with cilantro
    Easy Enchilada Suizas
  • cream cheese chicken enchiladas on a plate with red chili sauce, cheese, and avocados
    Chicken Enchiladas with Cream Cheese
  • beef enchilada Casserole with a slice cut out so you can see the layers of corn tortillas, beef, cheese and sauce
    Ground Beef Enchilada Casserole
  • a red bell pepper filled with ground beef, rice and bean mixture
    Super Stuffed Bell Peppers with Ground Beef
  • Grilled Steak Tacos assembled with pico de gallo and chipotle crema
    Grilled Steak Tacos Recipe with Chipotle Crema
  • Tilapia fish tacos topped with cilantro, corn and cream sauce
    Tilapia Fish Taco Recipe

Mexican Food For A Crowd

If you are feeding a crowd for Cinco De Mayo, then Carnitas or Barbacoa will be your go to recipes! They make great tacos, rice bowls, burritos, or enchiladas.

barbacoa on a baking sheet with two forks

Ground Beef Tacos are another great options for crowds. You may want to double or triple the recipe depending on your group size.

Doubling and Tripling Recipes

On Mom’s Dinner you can easily double recipes. Simply hover over the serving size in the recipe card. Use the +/- slider that appears to change how many servings you need and the recipe card will update the amounts for each ingredient.

Healthy Mexican Dinner

You will love these healthy Enchiladas made in zucchinis. The nice thing is that you will not even miss the tortilla. They are completely filling and you will still feel like you are eating a traditional enchilada!

zucchini enchiladas in a white casserole pan

Some other Healthy Mexican Dishes to check out:

  • ground turkey and sweet potato bowl
    Southwest Sweet Potato & Turkey Bowl
  • Mexican Chicken and Rice Casserole
    Healthy Mexican Chicken and Rice Casserole

Amazing Mexican Side Dishes

I believe that a side dish should not take longer than the main dish. Right!? That is why I love this recipe for 15 minute refried beans. They are quick to make and just as delish as if you soaked your beans overnight.

We also love this Instant Pot Mexican Rice!

a baking dish full of refried beans topped with cheese, cilantro and tomatoes

Some other Mexican Side Dish Faves:

  • a bowl of Street Corn Salad (aka. Esquites) garnished with limes and cilantro
    Easy Mexican Street Corn Salad
  • refried beans in a bowl with a spoon
    Instant Pot Refried Beans (No Lard)
  • fresh pineapple in a bowl with a citrus cilantro glaze over top
    Fresh Pineapple with Citrus Cilantro Glaze
  • a wooden bowl of cilantro lime slaw
    Cilantro Lime Coleslaw
  • Cilantro Rice in a bowl with limes and a wooden spoon
    Cilantro Rice (Chipotle Dupe)
  • Mexican Rice in a white bowl, picture from above
    Easy Mexican Rice

Mexican Dessert

Ok, I am pretty sure this Key Lime Cookies and Cream Ice Cream recipe isn’t actually a traditional Mexican Dessert, but the flavors are just perfect for the end of a Mexican dinner! Not to mention it could not be easier to make, you do not need any special ice cream making equipment. It is No Churn!

a loaf pan filled with key lime ice cream

We also love these Mexican Wedding Cookies for something a little more traditional.

a pecan snowball cookie that is broken in half to see the middle
Check Out All the Mexican Style Recipes on Mom’s Dinner!!

Extra Menu Planning Resources

  • a sign that says tacos and palm trees to the side
    How To Host a Taco Party That Slays
  • tomatillo salsa on a salsa bar
    How To Create A Salsa Bar At Home

Subscribe To Stay Connected!

Sign up for the Mom's Dinner Newsletter and get dinner help delivered straight to your inbox. From new recipes and videos to weekly dinner ideas and kitchen tips, it's your go-to resource for feeling confident at dinnertime.

Sign Up Now →

Easy Instant Pot Shredded Buffalo Chicken

April 16, 2019 by Susie Weinrich 9 Comments

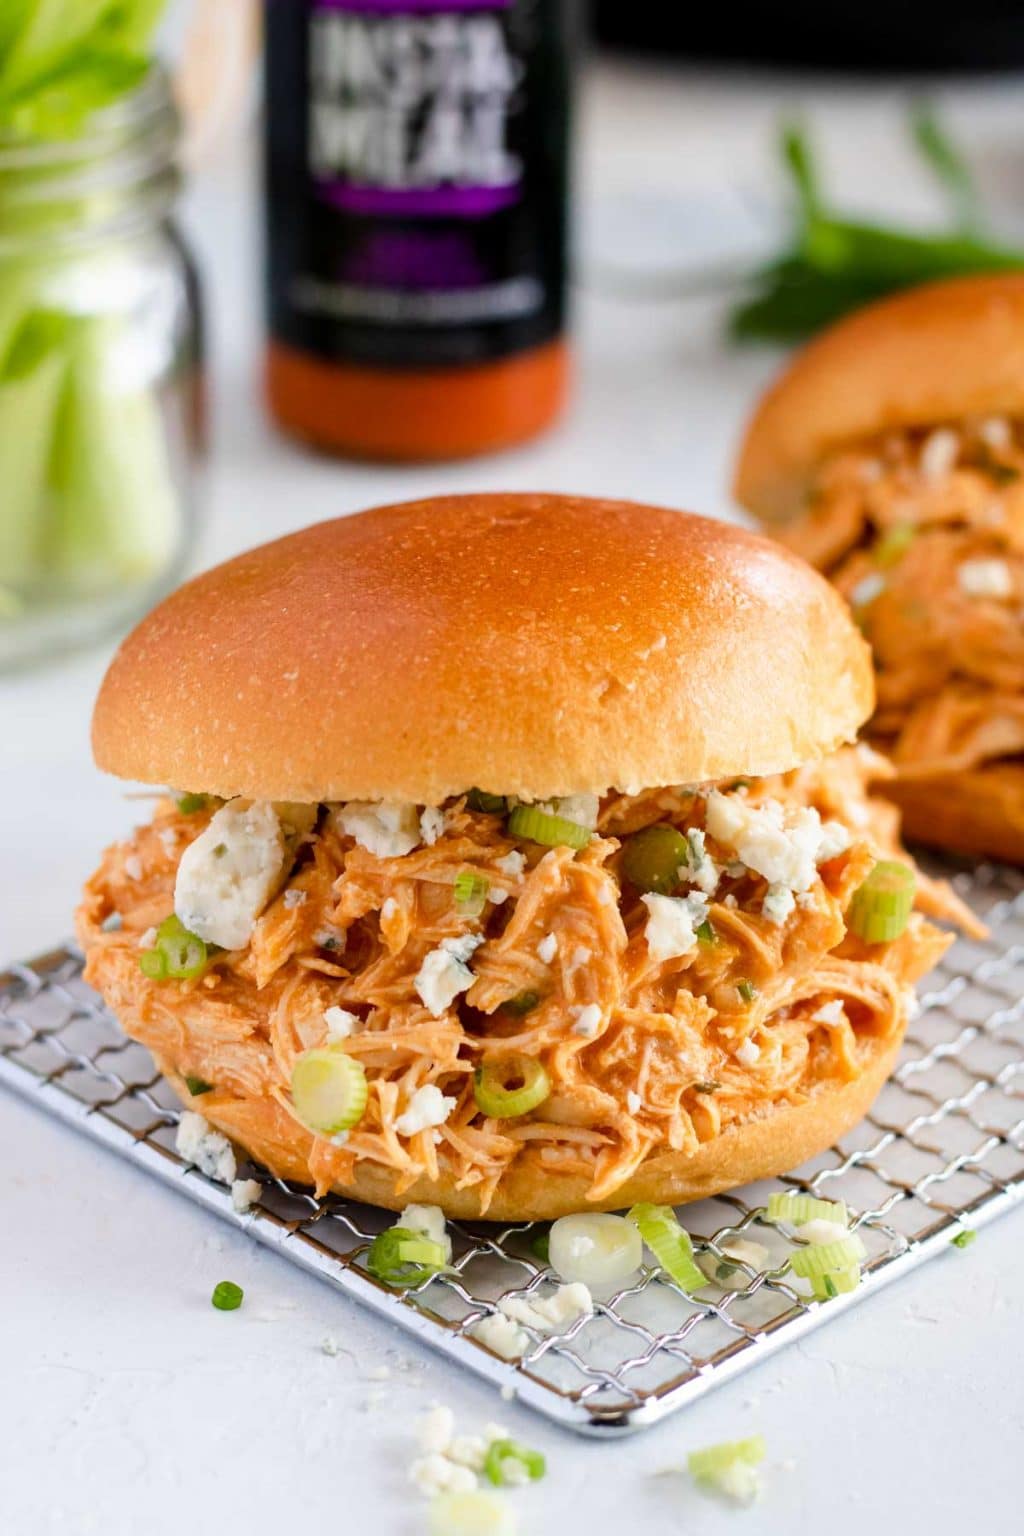
Shredded Buffalo Chicken Sandwich on a bun with blue cheese crumbles over top.

Instant Pot Buffalo Chicken is a little spicy mixed with herbs and seasonings to make the best buffalo chicken sandwiches! Grab your Instant Pot or Electric Pressure cookier and some chicken, fresh or frozen, cook it up in a tangy buffalo sauce, shred, and mix with ranch seasoning and cream cheese for the most flavorful buffalo chicken!!

Buffalo Chicken Sandwiches topped with blue cheese crumbles and green onions

I can’t even type or read “buffalo” without my mouth watering. I love the vinegar tang of buffalo sauce as well as the subtle heat tingle that lingers on your lips! And if you are reading this post, then I am guessing you feel the same. You would also love this Buffalo Chicken Burger!

[feast_advanced_jump_to]

Why You’ll Love This Shredded Buffalo Chicken

Forgot to thaw the chicken for dinner? No problem, this recipe works with fresh or frozen chicken!

Makes amazing leftovers. Pile it into sandwiches, wraps, salads, baked potatoes, or spooned on top of mac and cheese or tortilla chips. Make it once and spin it into multiple meals without anyone realizing it's leftovers.

Super easy! We all need some easy kitchen wins at dinner time and this one nails it!

Perfect flavor and texture balance. This recipe doesn’t just call for hot sauce and chicken, the flavors are totally balanced with a packet of ranch seasoning, cream cheese, and celery and onions for crunch and flavor.

Instant Pot Shredded Buffalo Chicken Ingredients

Chicken – For this recipe you can use boneless skinless chicken breasts, or a mix of breasts and boneless skinless chicken thighs. You also have the option to use fresh or frozen chicken, read more about that below.

Frank’s Red Hot Sauce – Frank's Red Hot is the classic choice for buffalo flavor and is easy to find at most grocery stores. If you have a different buffalo style hot sauce you love, feel free to use it just keep in mind heat levels can vary by brand.

Dry Ranch Packet – A dry ranch seasoning packet adds instant flavor with zero extra effort. We have tested a lot of different brands and find that Hidden Valley has the very best flavor.

Cream Cheese – The cream cheese not only adds amazing flavor balance to your Buffalo Chicken, it thickens the sauce perfectly so it clings to the chicken.

Celery and Green Onions – These two add a crunch and bite of flavor complexity to the Buffalo Chicken.

Use Fresh or Frozen Chicken

How often do you forget to thaw the chicken to make dinner?? Totally guilty over here✋🏼! 

That is one reason I love recipes for the Instant Pot- you can use your frozen chicken, and with just a little extra time it comes out just as great as fresh chicken. You can use fresh or frozen chicken in this buffalo chicken recipe. Both instructions are below in the recipe card.

How to Make Instant Pot Buffalo Chicken

  1. Grab 2 lbs. of either fresh or frozen boneless skinless chicken breasts. Place them in your Instant Pot (if you are using frozen make sure the breasts are not in one big block, they will not cook through that way. You may need to run a little warm water over them to separate).
  2. Spray a little non-stick spray on the bottom of the pot, add the chicken and then pour 1 cup of Frank’s Red Hot Original Sauce over the chicken. 
buffalo sauce pouring into an instant pot
  1. Cooking Times are as follows:

Fresh: if you are using fresh chicken set the Instant Pot to cook on pressure mode, on high, for 10 minutes

Frozen: if you are using frozen chicken set the Instant Pot to cook on pressure mode, on high, for 15 minutes.

  1. After the cooking time is through, do a quick release of pressure by turning the pressure valve to “vent”.
buffalo chicken cooked in the instant pot being shredded with two forks
  1. Remove the chicken from the pot, leaving the liquid behind. Shred the chicken using two forks. (Kitchen Tip- I like to shred my chicken on a rimmed sheet pan, that way any liquid on or in the chicken won’t run all over your countertops) Set the chicken aside, and make the buffalo sauce.
  2. Back at the Instant Pot, set it to sauté mode. Whisk in the ranch dressing powder mix packet, and the cream cheese until it is completely incorporated. You can turn the sauté mode off.
  3. Add the shredded chicken, celery, and green onions to the sauce. Give it a stir to coat the chicken with the sauce completely. 
Chicken, celery, green onions, and buffalo sauce in the instant pot

Make Ahead

This buffalo chicken can absolutely be made ahead. You can make it up to 4 days in advance and store in the fridge.  The buffalo chicken is great warm, cold, or at room temp. 

Storing and Freezing

Fridge: Let the shredded buffalo chicken cool slightly, then transfer it to an airtight container. Store it in the refrigerator for up to 4 days. The sauce actually helps keep the chicken moist, so it reheats really well for leftovers.

Freezer: Shredded buffalo chicken freezes beautifully. Once cooled, portion it into freezer safe containers or freezer bags. Flattening bags before freezing makes them easy to stack and helps them thaw faster. Freeze for up to 3 months for best flavor and texture.

Thaw overnight in the fridge or use the microwave's defrost setting for quicker meals. Reheat gently on the stovetop or in the microwave, stirring occasionally so the sauce stays creamy and evenly heated. If needed, add a little broth to loosen things back up.

How to Use Instant Pot Buffalo Chicken

The very best way to use this Instant Pot Buffalo Chicken is heaped in a bun for buffalo chicken sandwiches.  Toast some buns, top with the buffalo chicken mixture, add some blue cheese crumbles and ranch over top. This would also be amazing with this blue cheese and celery slaw over top!

You could also use this chicken for:

  • buffalo chicken wraps
  • buffalo chicken served over rice (or cauliflower rice)
  • spicy chicken tacos 
  • buffalo chicken dip- just mix ½ the chicken in an extra 4 oz. cream cheese and some Monterey jack cheese, pop it in the oven at 350 degrees for 15 minutes.

More Buffalo Style Recipes

  • a bowl of instant pot buffalo chicken chili
    Instant Pot Buffalo Chicken Chili
  • buffalo chicken nachos with toppings being grabbed by a hand
    Loaded Buffalo Chicken Nachos
  • Buffalo chicken burger on a sesame seed bun with buffalo aioli and celery blue cheese slaw with kettle chips on the side.
    Grilled Buffalo Chicken Burger with Blue Cheese Mayo

Susie leaning on the kitchen counter

WATCH SUSIE ON FOOD NETWORK!

⭐⭐⭐⭐⭐

The new gameshow, 100 Cooks, premieres on Food Network June 7th, 2026 at 9est/8cst. I hope you will tune in!

shredded buffalo chicken sandwich with extra blue cheese crumbles

Easy Instant Pot Shredded Buffalo Chicken

Tender Shredded Chicken cooked in the Instant Pot is mixed with tangy buffalo sauce, seasonings, and cream cheese. This Instant Pot Chicken makes amazing buffalo chicken sandwiches!
Can be made with fresh or frozen chicken breasts.
4.25 from 4 votes
Print Pin Rate Save Saved!
Prep Time: 5 minutes minutes
Cook Time: 10 minutes minutes
pressure time: 10 minutes minutes
Total Time: 15 minutes minutes
Servings: 2 lbs. shredded chicken
Author: Susie Weinrich

Equipment

  • Instant Pot or Electric Pressure Cooker

Ingredients

  • 2 lb. boneless skinless chicken breasts - fresh or frozen
  • 1 cup Frank's Red Hot Original Sauce
  • 1 oz packet Ranch dressing mix (powder)
  • 1 cup celery - diced
  • ⅓ cup green onions - chopped, white and light green parts
  • 4 oz cream cheese - room temp.
  • non stick spray

Serving

  • toasted buns
  • blue cheese crumbles, ranch dressing, blue cheese dressing
  • lettuce, extra chopped green onions

Instructions
 

  • Spray a little non stick spray in the bottom of the Instant Pot.
    non stick spray
  • Place the *fresh or frozen* chicken breasts in the Instant Pot, in one layer. If your chicken breasts are really thick, I recommend cutting them in half so they cook properly.
    Pour in the buffalo sauce.
    2 lb. boneless skinless chicken breasts, 1 cup Frank's Red Hot Original Sauce
  • COOK TIME *for fresh chicken – set the IP to pressure cook, normal heat – high pressure, for 10 minutes.
    COOK TIME *for frozen chicken – set the IP to pressure cook, normal heat – high pressure, for 15 minutes. Make sure the frozen chicken breasts are separated and not in one big block.
  • After the cooking time is up, do a quick release of pressure. Remove the chicken breasts from the pot, leaving the sauce behind. Shred the chicken breasts with two forks, and set aside.
  • With the pot on sauté mode, whisk the powder ranch dressing mix packet into the buffalo sauce and the cream cheese until it is completely melted and incorporated.
    1 oz packet Ranch dressing mix (powder), 4 oz cream cheese
  • Add the shredded chicken, celery and onions to the sauce mixture and stir to coat the chicken completely.
    1 cup celery, ⅓ cup green onions
  • The mixture will thicken as it sits.

Serving

  • Excellent served as buffalo chicken sandwiches on toasted buns, topped with blue cheese crumbles and extra ranch!
    Would also be great topped with Blue Cheese & Celery Slaw!
  • Can also be used as:
    buffalo chicken wraps
    buffalo chicken served over rice (or cauliflower rice)
    spicy chicken tacos 
    buffalo chicken dip- just mix ½ the chicken in an extra 4 oz. cream cheese and some Monterey jack cheese, pop it in the oven at 350 degrees for 15 minutes.

Recipe Tips and Notes:

This can be made ahead and stored in the fridge for up to 4 days. It is great warm, cold, or room temp.
Did you make this recipe?Connect with me and let me know by commenting below!
Jump to Comments

Teriyaki Beef Noodles (Instant Pot)

April 11, 2019 by Susie Weinrich 11 Comments

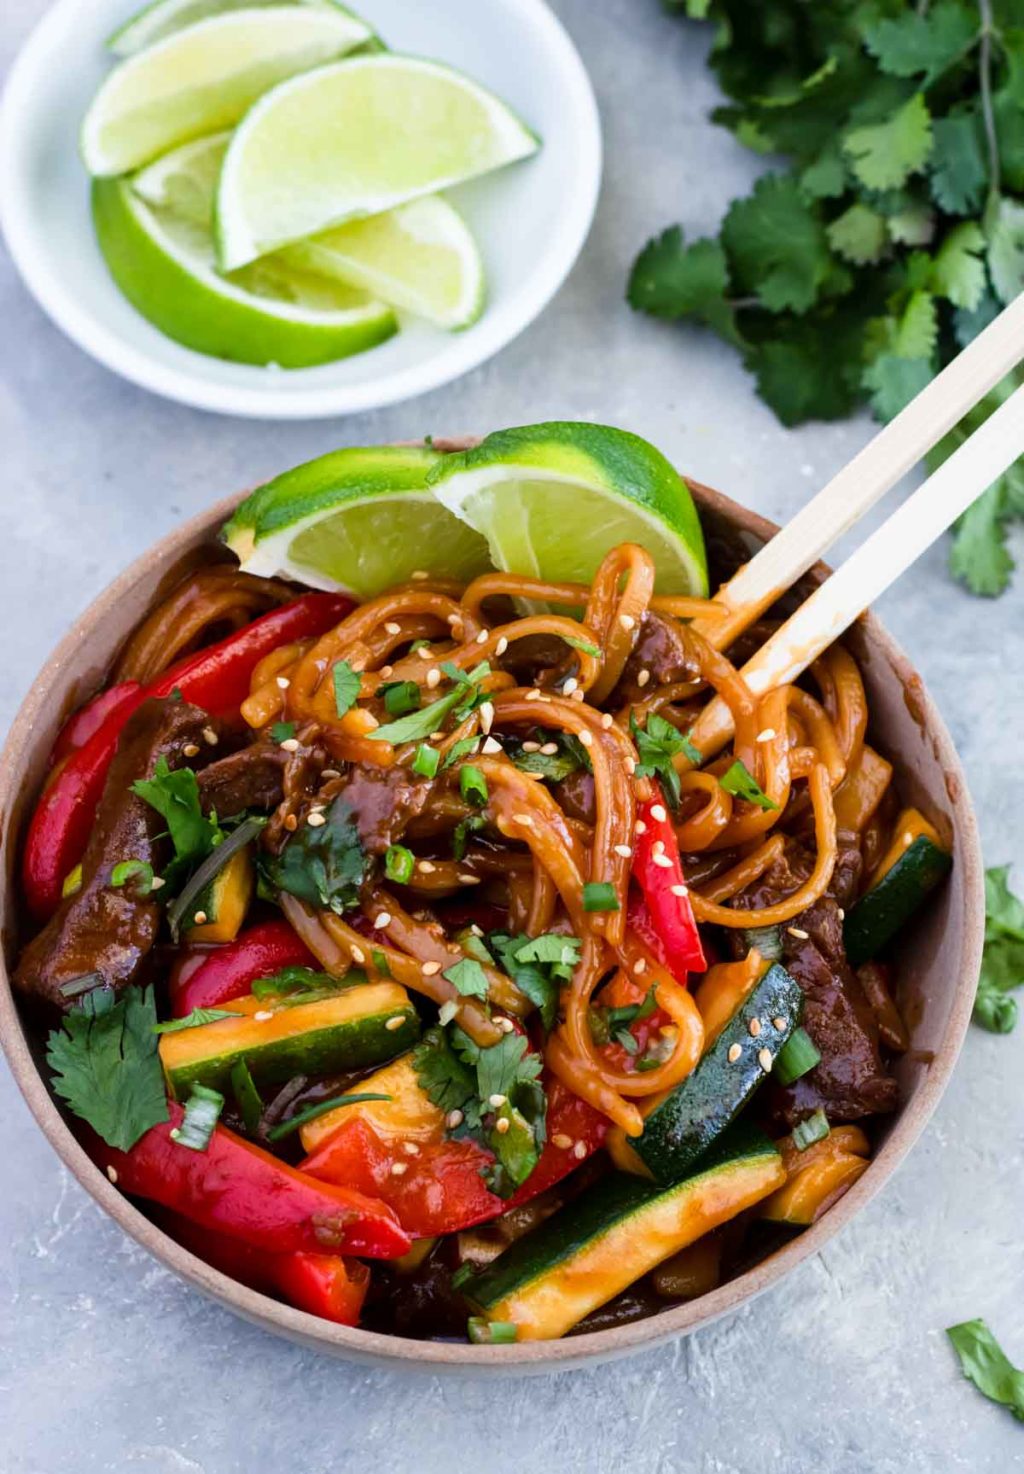
Instant Pot Teriyaki Beef Noodles in a bowl with chopsticks

Teriyaki Beef Noodles is an amazing recipe to make in the Instant Pot. Rice noodles and tender beef are coated in an amazing Sweet & Spicy Teriyaki Sauce from Insta-Meals, then it is loaded with veggies that are cooked to tender-crisp perfection! This is a perfect Asian Instant Pot recipe to make for dinner.

Instant Pot Teriyaki Beef Noodles in a bowl with chopsticks

You will also love this recipe because it is an all-in-one pan dinner. It has your starch, protein and veggie all in one, no need to make any extra side dishes. Winning!!

[Read more…]

How to Make Jalapeno Tequila

April 9, 2019 by Susie Weinrich 22 Comments

jalapenos in tequila in a glass bottle

This recipe for jalapeno infused tequila has the perfect balance of salty tequila flavor, spice from the jalapenos, mixed with a hint of the verdant/herby jalapeno flavor. Not to mention it is unbelievably easy to make! You just need a little time and these two ingredients: 2 Fresh Jalapenos, and your favorite, quality Silver Tequila.

jalapeno tequila in a bottle with a bottle of jose cuervo in the background

Then you will be making the BEST tequila cocktails at home that will give you just a hint of tingly spice in the back of your throat. Perfection!!

Jalapeno Tequila is absolutely my new obsession. I love how, in a cocktail, it gives you just the right amount of tingle and heat in your throat.

In restaurants you can enjoy the best spicy margaritas, or jalapeno palomas. But when it comes to making those drinks at home, it is surprisingly hard to find a good jalapeno infused tequila in the store! So, I got to making my own, and you should too.

RELATED: Hot Honey Margarita

Ingredients

It is super simple to make this Infused Jalapeno Tequila, you just need two very specific ingredients;

  1. A silver tequila that you love.
  2. Fresh jalapenos.

Jalapenos

For this recipe you can choose to use 1 or 2 jalapenos. I actually do not like a TON of spice, I like my spicy drinks to give just a little tingle, not an all out fire.

jalapeno cut open in a bowl

I use 2 medium sized jalapenos.

If you choose to use just 1 jalapeno you will have just a slight warmth and verdant/herby flavor in your tequila.

HOW TO PICK A SPICY OR MILD JALAPENO

When you are at the grocery store and there is a pile of jalapenos to choose from, you can actually choose a spicy or mild jalapeno! Here’s how:

  • For a super spicy jalapeno look for the ones that have lines or specks on them. They will almost look like stretch marks or little flecks of white or brown. Those are called heat marks and indicate a HOT PEPPER!
  • Also the peppers that have some red or are turning completely red are older peppers and can tend to be hotter.
  • For a more mild jalapeno pepper choose ones that have smooth bright green skin.

Tequila

For this recipe I use Jose Cuervo Especial Blue Agave Tequila or Jose Cuervo Tradicional. However, feel free to use whatever silver or blanco tequila you prefer.

a bottle of silver tequila with jalapenos around the edge

TEQUILA BRANDS WE LOVE

If you are not super familiar with tequila, let me get you started with some different price points. These have all been (happily) tested by me:

  • Jose Cuervo Tradicional $
  • Costco Tequila (Kirkland) $ (some call it Costco-migos because it tastes like the much more expensive Casamigos!)
  • Cazadores $$
  • Espolon $$
  • Casamigos $$$
  • Patron $$$
  • Clase Azul $$$$

When you are making an infused tequila I would stick with a mid to low range tequila. Some of the higher priced ones should be sipped over ice or mixed in a martini or highball cocktail.

How to Make Jalapeno Infused Tequila

After you learn how to make jalapeno tequila at home you will be wondering why you have been paying $12 for each cocktail at a restaurant, when you can have an entire bottle for under $20 at home.

  1. Pour Tequila Into Larger Bottle
  2. You can pour the tequila into a larger glass bottle that has a lid. Or you can pour a little tequila out of the bottle, making room for the jalapenos.

    pouring tequila into a glass bottle
  3. Add Jalapenos
  4. Slice the fresh jalapenos lengthwise, leaving all the seeds and ribs in the jalapeno. Place them in the jar/bottle with the tequila.

  5. Steep The Tequila and Jalapeno
  6. Let the mixture sit on the counter, covered, at room temp, for 10-12 hours. I find that is the perfect amount of time to allow some heat and flavor to steep into the tequila.

    overhead view of jalapenos in tequila
  7. Strain!!
  8. After 10-12 hours it is time to strain the jalapenos and seeds from the tequila. I like to do this with a small strainer that is held over a funnel placed into either the empty tequila bottle or another glass bottle with a lid.

    Discard the used jalapenos. However, if you are making cocktails right away you can slice them for cocktail garnishes.

Storing Infused Tequila

Store your jalapeno tequila just as you would store normal tequila. I keep mine at room temp in a cabinet. It does not need to be refrigerated and should last up to 6 months.

Drinks to Make with Jalapeno Tequila

Any tequila drink that you want to add a little spice to will work well. Here are some of my faves, and of course there will be more recipes to come!

  • Margarita on the Rocks
  • Hot Honey Margarita
  • Pineapple Jalapeno Margarita
  • Cucumber Margarita
  • Ranch Water
  • Blackberry Tequila Smash
  • Blueberry Margarita
  • Traditional Paloma

FIND MORE TEQUILA RECIPES HERE!

tequila mule cocktail

More Tequila Recipes To Love

  • a cocktail glass filled with ice, tequila, and soda water, topped off with two lime wedges
    Tequila Soda
  • Tequila Hot Toddy from above
    21 Tequila Cocktails Perfect for Fall
  • ginger margarita cocktail with a lime and fresh ginger coin
    Fresh Ginger Margarita
  • Anejo old fashioned with a large ice cube and an orange peel and Luxardo cherry
    Añejo Tequila Old Fashioned – Two Ways!

Susie leaning on the kitchen counter

WATCH SUSIE ON FOOD NETWORK!

⭐⭐⭐⭐⭐

The new gameshow, 100 Cooks, premieres on Food Network June 7th, 2026 at 9est/8cst. I hope you will tune in!


jalapenos in tequila in a glass bottle

Jalapeno Tequila Recipe

The best recipe for homemade jalapeno tequila that has just the right amount of spiciness to give you a little warmth in your cocktail. 
5 from 9 votes
Print Pin Rate Save Saved!
Prep Time: 5 minutes minutes
Steeping: 12 hours hours
Total Time: 5 minutes minutes
Servings: 750 mL
Author: Susie Weinrich

Ingredients

  • 2 fresh jalapenos, cut in half lengthwise, keep the ribs and seeds - for less heat, use 1 jalapeno
  • 1 750 ml bottle of silver or blanco tequila - I use Jose Cuervo Especial Blue Agave Silver Tequila

Instructions
 

  • Combine the entire bottle of tequila and the cut jalapenos in a glass container or pitcher. 
    Let it sit at room temp, covered, for 10-12 hours.
  • Strain the jalapenos and seeds from the tequila using a fine mesh strainer (make sure there is a container under the strainer, don’t pour your tequila down the drain).
  • Store in a glass container with a lid (can use the tequila bottle) for up to 6 months. 

Serving

  • Use in your favorite tequila drinks to give it a little heat!
    I do not recommend the tequila for shots (LOL)

Recipe Tips and Notes:

Cocktails for Your Jalapeno Tequila: 
  • Margarita on the Rocks
  • Hot Honey Margarita
  • Pineapple Jalapeno Margarita
  • Cucumber Margarita
  • Ranch Water
  • Blackberry Tequila Smash
  • Blueberry Margarita
FIND MORE TEQUILA RECIPES HERE!
Did you make this recipe?Connect with me and let me know by commenting below!
Jump to Comments

4 Ingredient Beer Bread

April 3, 2019 by Susie Weinrich 23 Comments

beer bread cut into slices

This Beer Bread recipe is easy to make and only requires 4 ingredients! It comes out of the oven with the most beautiful textured golden crust. By covering the dough in butter before you pop in in the oven you create a crispy, buttery top. When you bite into a fresh slice you can literally hear the crunch of the crust, followed by the soft bread inside.

beer bread on a cutting board with slices

The flavor is truly unique. It reminds me of a mellow sourdough with a hint of beer in the background. In a subtle, can't place the flavor, kind of way.

Easy Beer Bread Recipe

Is there a smell better that baking bread? I'm going to answer that for you, NO! Or how about the taste of a freshly sliced piece of homemade bread with (real, salted) butter melting over the top. My mouth is watering!

But let me quickly break you out of this carb trance with the the thought of kneading, proofing, kneading, proofing, waiting….exhausting….boring! I do not have time for all that. Do you??

A loaf of 4 ingredient beer bread cooling on a cooling rack

That is why I was thrilled when my sister gave me this recipe a few years ago!! It requires no kneading, no proofing, no waiting! You just sift flour, open a beer, pour, and mix. Anyone can do that. Even my husband can do that, maybe.

Beer Bread Ingredients

Yep, only 4 simple ingredients for this beer bread recipe. If you happen to have self rising flour (that is not expired) in your pantry then you can make this now! All you need is:

  • 12 oz beer
  • 3 cups self rising flour
  • 2 tablespoon sugar
  • 3 tablespoon butter
4 ingredients for beer bread

    How to Make Beer Bread

  1. Beer
  2. Start by pouring a 12 oz beer into a large bowl. Pour it down the side of the bowl so it doesn’t get too fizzy!

  3. Self Rising Flour + Sugar
  4. Then in a separate bowl whisk together 3 cups of self rising flour and 2 tablespoon of sugar.

  5. Combine
  6. Pour the flour mixture into the beer. Stir lightly JUST UNTIL IT comes together. Over mixing will cause your beer bread to be tough.

    batter for beer bread
  7. Pour Into Loaf Pan + Bake
  8. Pour the bread dough into a greased loaf pan. Then melt the 3 tablespoon of butter and pour over top of the dough. That is what will give you a golden crispy crust! YUM

    beer bread dough topped with melted butter

    Now bake the beer bread on 375 degrees for 40-45 minutes.  Let the butter cool for about 5 minutes before digging in.

Beer Bread Recipe Variations

This bread can be spiced up, literally, to go with the menu you are serving or to use up herbs you have in your fridge.  Here are some ideas for adding flavors to your bread:

  • chopped fresh rosemary
  • italian herb mixture
  • fresh minced garlic
  • dill
  • shredded cheddar cheese and garlic
  • chopped chives
  • kalamata olives
slices of beer bread with butter smeared

I have used Miller Light, Bud Light, Michelob Ultra Light and Boulevard Pale Ale and they have all worked perfectly!

Let me know in the comments what type of beer you choose to use in the recipe!

Serving Beer Bread

4 Ingredient Beer Bread makes an amazing table bread, especially if you are able to serve it straight out of the oven when it is crispiest! If you choose to make this bread ahead follow these steps to make the most delicious golden toasty table bread:

  • Cut bread into thick slices
  • Butter both sides and place them on a sheet pan. Add any seasoning you would like (garlic).
  • Place in a 400 degree oven for 5-8 minutes, flipping the slices half way thru.

Variations on Oatmeal with Fruit

What is the best beer for beer bread?

From the research I have done online it looks like you can use just about any beer you would like, pilsner, light beer, stout, IPA. Just like using wine in food, use a beer that you would like to drink. Although I would recommend staying away from some of the new flavored beers, like lime and orange.

What to eat with beer bread?

Beer Bread is great as just a table bread for dinner, served with comfort food, or toast it up and slather on some salted butter. Here are some specific recipes it pairs well with:
– Chili
– Beef stew or pot roast
– Potato soup
– Meatloaf
– Eggs and bacon

Should beer be warm or cold for beer bread?

I have made this Beer Bread recipe with both cold and room temp beer and it works both ways!

More Great Bread Recipes

  • cornbread with a sliced turned to the side and covered in honey
    Homemade Buttermilk Cornbread
  • Thick slices of banana bread cut away from the loaf.
    Easiest Banana Bread Recipe
  • bone breadsticks on a table with marinara sauce
    Bloody Bone Breadsticks

Susie leaning on the kitchen counter

WATCH SUSIE ON FOOD NETWORK!

⭐⭐⭐⭐⭐

The new gameshow, 100 Cooks, premieres on Food Network June 7th, 2026 at 9est/8cst. I hope you will tune in!

beer bread cut into slices

Beer Bread Recipe

A super easy beer bread recipe made with only 4 ingredients. No kneading, proofing or waiting. Simply mix the 4 ingredients together and pop it in the oven. Customize the flavor with any herbs you would like.
5 from 6 votes
Print Pin Rate Save Saved!
Prep Time: 10 minutes minutes
Cook Time: 45 minutes minutes
Total Time: 55 minutes minutes
Servings: 1 loaf
Calories: 1932kcal
Author: Susie Weinrich

Equipment

  • loaf pan

Ingredients

  • 3 cups self rising flour
  • 2 Tbsp. sugar
  • 3 Tbsp. butter - melted
  • 12 oz can of beer (or bottle)
  • **optional- spices or herbs (garlic, chives, olives, rosemary)

Instructions
 

Preheat the oven to 375. Prepare your loaf pan with baking spray.

  • Pour beer into a large bowl, and set aside.
    12 oz can of beer (or bottle)
  • Measure 3 cups of self rising flour into a separate bowl. Add the sugar to the flour and stir to mix. (add herbs/mix-ins here, if using)
    3 cups self rising flour, 2 Tbsp. sugar
  • Pour the flour mixture into the beer and mix JUST UNTIL MOIST & COMBINED. Overmixing will cause your loaf to be tough.
  • Pour dough into prepared loaf pan.
  • Top with melted butter.
    3 Tbsp. butter
  • Bake for 40-45 minutes, until golden and crisp on the top.

Recipe Tips and Notes:

BEER- just about any beer will work. I have tried Bud light, Miller lite, Michelob Ultra, and even a Boulevard Pale Ale. I would just avoid some fruity flavored beers like lime or orange.
Did you make this recipe?Connect with me and let me know by commenting below!
Jump to Comments
Serving: 1loaf | Calories: 1932kcal | Carbohydrates: 314g | Protein: 47g | Fat: 42g | Saturated Fat: 24g | Polyunsaturated Fat: 4g | Monounsaturated Fat: 10g | Trans Fat: 1g | Cholesterol: 95mg | Sodium: 307mg | Potassium: 478mg | Fiber: 9g | Sugar: 31g | Vitamin A: 1116IU | Calcium: 81mg | Iron: 3mg

Weekly Meal Plan & Grocery List #12

April 2, 2019 by Susie Weinrich 2 Comments

Free Meal Plan and Grocery List Pin Image

Planning dinner for your family for an entire week can be hard! What should we eat for dinner? What do I need to buy at the store? Let me answer both of those questions with my free weekly meal plan including a printable grocery list (and bonus leftover re-do ideas)!

FREE FAMILY MEAL PLAN

Your family needs to eat, and the job of feeding them lands squarely on your shoulders.

The key to making this job easy is MEAL PLANNING!

Plan all your meals for the week, write out your grocery list, and then head to the store to buy the groceries. Sounds easy enough, but I think a lot of us just end up at the grocery store buying the same things week after week, and then we get home and say "I have nothing to cook for dinner!"

[Read more…]

Instant Pot Buffalo Chicken Chili

March 29, 2019 by Susie Weinrich 15 Comments

a bowl of instant pot buffalo chicken chili

Instant Pot Buffalo Chicken Chili is the perfect blend of spicy tangy buffalo sauce mixed with shredded chicken, sweet corn, tomatoes, ranch, cilantro and cooling cream cheese. This is the Instant Pot Soup recipe you want when a buffalo sauce craving strikes, any time of year, but especially during football season! This is perfect game day food.

a white bowl of buffalo chicken chili

If you are a spicy buffalo flavor lover you will also want to check out these buffalo chicken nachos and buffalo chicken sandwiches.

What is Buffalo Chicken Chili

If you love buffalo flavor, then you LOVE buffalo flavor! There is no middle ground with the spicy tangy flavor. You either love it and your mouth waters when you think or talk about it, or it is not your jam. I am guessing since you are looking at this recipe, then buffalo flavor is your thing, chicken wing.

We all know buffalo chicken wings, buffalo chicken dip, and buffalo chicken sandwiches. But, have you had buffalo chicken chili before?

It is the type of chili that you will eat until your stomach hurts because it is so good.

This Buffalo Chicken Soup starts with a base of onions, garlic, bell pepper and celery, then you add chicken broth, buffalo sauce and chicken breasts. That all cooks in the Instant Pot, then you add diced tomatoes, northern beans, corn, cilantro and cream cheese.

Buffalo Sauce

I highly recommend using Franks Original Red Hot. It has the perfect balance of spice, tang and flavor. Of course you can use a similar brand if you have one you prefer.

Franks Red Hot Sauce

(I have also used the Aldi brand and that worked great)

I have not tried this recipe with the Franks Red Hot WING sauce. The bottle will say “Wings” right on the label. I believe this is a thicker ready-to-use on chicken buffalo wings style sauce. It will probably still work, but I can’t give you a guarantee.

Step by Step Instructions

If you love cooking shows you can also watch Susie make this recipe in a 30 minute Pinterest TV episode.

This is a great Instant Pot Chicken Chili that, I think, can be enjoyed year round, even in the summer. Here’s how you make it:

Start by turning on the sauté function and soften the bell peppers, onions, garlic, and celery in the pot, in oil, for about 5-8 minutes.

Turn off the sauté mode

Add the raw chicken breasts, broth, ranch dressing powder packet, and buffalo sauce. Give it a stir and then place the lid on the pot. Turn the pressure vent to seal, and set the pot to manual on high pressure for 12 minutes.

instant pot with buffalo sauce being poured in

Once it is done cooking, turn the pressure valve and do a quick release.

Remove the chicken from the pot and shred or dice, and then set it aside while you finish the chili.

Pro Tip: You can EASILY shred chicken by placing the warm/hot cooked chicken in a stand mixer with a paddle attachment and running for about 20 seconds. Works like a charm!

shredded chicken on a rimmed baking sheet

Turn the pot back on to sauté mode and add the cream cheese to the pot and & whisk the cream cheese until it is melted and fully incorporated. If you like a little extra spice, try only adding half the cream cheese.

Now stir in the drained diced tomatoes, drained beans, corn, cilantro, shredded chicken, and honey. Give it a stir and it is ready to serve!

Instant Pot with a ladle full of buffalo chicken soup

Stove Top Instructions

If you don’t have an Instant Pot but still want to make this Buffalo Chicken Chili Recipe here are the instructions. Just make sure you use cooked shredded chicken breasts, not raw chicken. You can poach or bake the chicken or use a rotisserie chicken.

  • Sauté the onion/pepper/celery/garlic mixture in oil for about 10 minutes to really soften.
  • Then add these ingredients: shredded cooked chicken, (1 oz) packet ranch dressing mix (dry powder packet), 4 cups chicken broth, ¾ cup Buffalo sauce, 14.5 oz can diced tomatoes drained, and 15.5 oz can great northern beans drained increase the heat and bring to a boil, then reduce the heat to low and simmer for 10 minutes.
  • Then remove from the heat and stir in 1 cup frozen corn (heaping), ⅓ cup cilantro chopped, 8 oz block cream cheese and 1 T honey.
  • Stir until the cream cheese is completely mixed in.

Troubleshooting Spice Levels

As always try the chili before you serve it. Maybe you want more salt, more heat, or it’s too spicy?! Here are some tips for troubleshooting the spice level:

  • Don’t like things too spicy? Only add ½ cup of buffalo sauce.
  • Too late, it’s already too spicy? Add more cream cheese or you can stir in ¼-1/2 cup of whole milk, half & half, or heavy cream.
  • Just started, give me all the spice! Add a chopped jalapeno when you are sautéing the onions, celery and bell pepper
  • Chili is ready, and I want more spice! Pour in another ¼ cup of buffalo sauce. You can also add a few pinches of ground cayenne pepper or a couple dashes of your favorite hot sauce.

Toppings

We are talking buffalo here after all, so I highly recommend a little blue cheese crumbled over top, some tortilla chips crumbled into the soup, and maybe even some celery sticks on the side! Here are some other great topping ideas:

  • fresh chopped cilantro
  • fresh diced avocado
  • pickled jalapenos (for extra spice!)
  • Monterey jack cheese
  • sour cream or Greek yogurt
  • blue cheese crumbles
  • chopped celery or green onions
  • Fritos or tortilla chips
  • red pepper flakes for you spicy people out there!

Side Dishes For Serving

Since this Instant Pot chicken chili is on the spicier side you want to serve cooling type side dishes. Here are some side dishes to consider:

  • cornbread (and you know I have the best recipe!)
  • Cornbread Muffins
  • Buttermilk Cornbread
  • tortilla chips or Fritos
  • celery & carrots with ranch or blue cheese dip
  • Cinnamon Rolls or Crescent Cinnamon Rolls

More Chili Recipes

If you love the warm flavors of chili then you are in the right place to find some stand out chili recipes!

  • a bowl of chili made in the instant pot with jalapenos, fritos and sour cream on top
    Damn Good Instant Pot Chili
  • a bowl of chicken chili topped with sour cream and two limes
    30 Minute Instant Pot Chicken Chili
  • a big bowl of chili topped with green onions
    Traditional Chili
  • a bowls of chili with turkey topped with sour cream, fritos and green onions
    Thick & Hearty Turkey Chili

Susie leaning on the kitchen counter

WATCH SUSIE ON FOOD NETWORK!

⭐⭐⭐⭐⭐

The new gameshow, 100 Cooks, premieres on Food Network June 7th, 2026 at 9est/8cst. I hope you will tune in!

a bowl of instant pot buffalo chicken chili

Instant Pot Buffalo Chicken Chili Recipe

Instant Pot Buffalo Chicken Chili is the perfect blend of spicy tangy buffalo sauce mixed with shredded chicken, sweet corn, tomatoes, ranch, cilantro and cooling cream cheese.
(stove top instructions in the notes)
LISTEN TO THE AUDIO RECIPE WITH THE PLAYER BELOW. Or watch Susie make this Buffalo Chicken Chili in a 30 minute Pinterest TV Episode.
5 from 6 votes
Print Pin Rate Save Saved!
Prep Time: 20 minutes minutes
Cook Time: 12 minutes minutes
Total Time: 27 minutes minutes
Servings: 6 people
Calories: 307kcal
Author: Susie Weinrich

Equipment

  • Instant Pot or Electric Pressure Cooker

Ingredients

  • 1 tablespoon oil
  • 1 Yellow Onion - diced (will be about 1 heaping cup)
  • 3 plump garlic cloves - chopped
  • 1 cup celery - chopped
  • 1 cup bell pepper - chopped (any color)
  • 2 large chicken breasts - cut in half making 4 pieces
  • 1 (1 oz) packet ranch dressing mix (dry powder packet)
  • 4 cups chicken broth
  • ¾ cup Buffalo sauce - Franks Red Hot Original is great
  • 14.5 oz can diced tomatoes - drained
  • 15.5 oz can great northern beans - drained
  • 1 cup frozen corn - (heaping)
  • ⅓ cup cilantro - chopped
  • 8 oz block cream cheese
  • 1 T honey

Optional Garnishes for Serving

  • green onion, blue cheese crumbles, chopped celery, pickled jalapeno, chopped fresh avocado, sour cream

Instructions
 

  • Set the Instant Pot on Saute mode. Once it reads HOT add the oil to the pot and soften the onions, garlic, celery, and bell pepper for about 5-8 minutes.
    1 Tbsp oil, 1 Yellow Onion, 3 plump garlic cloves, 1 cup celery, 1 cup bell pepper
  • Turn the saute mode off.
  • Add the raw boneless skinless chicken breasts, ranch dressing powder mix, chicken broth and buffalo sauce to the pot. 
    Place the lid on the Instant Pot and lock the pressure valve to "seal". Set the Instant Pot to Meat/Stew or Pressure mode, on high, for 12 minutes.
    2 large chicken breasts, 1 (1 oz) packet ranch dressing mix (dry powder packet), 4 cups chicken broth, ¾ cup Buffalo sauce
  • After it is done do a quick release of the pressure.
  • Remove the cooked chicken from the pot and shred or dice. Set aside.
  • Turn on saute mode and add the cream cheese (if you like your chili really spicy you can add half the cream cheese amount). Stir and whisk the cream cheese into the soup until it has incorporated completely.
    8 oz block cream cheese
  • Stir in the shredded or diced chicken, drained tomatoes, drained beans, corn, cilantro, and honey to the soup.
    14.5 oz can diced tomatoes, 15.5 oz can great northern beans, 1 cup frozen corn, ⅓ cup cilantro, 1 T honey
  • Give it a good stir and enjoy!

Troubleshooting Spice Levels

  • Don't like things too spicy? Only add ½ cup of buffalo sauce.
  • Too late, it's already too spicy? Add more cream cheese or you can stir in ¼-1/2 cup of whole milk, half & half, or heavy cream.
  • Just started, give me all the spice! Add a chopped jalapeno when you are sautéing the onions, celery and bell pepper
  • Chili is ready, and I want more spice! Pour in another ¼ cup of buffalo sauce. You can also add a few pinches of ground cayenne pepper or a couple dashes of your favorite hot sauce.

Recipe Tips and Notes:

Sides for Serving: 
  • cornbread (and you know I have the best recipe!)
  • Cornbread Muffins
  • Buttermilk Cornbread
  • tortilla chips or Fritos
  • celery & carrots with ranch or blue cheese dip
  • Cinnamon Rolls or Crescent Cinnamon Rolls

STOVE TOP INSTRUCTIONS:
Make sure you use cooked shredded chicken breasts, not raw chicken when cooking on the stove top.  You can poach or bake the chicken or use a rotisserie chicken.
  • Sauté the onion/pepper/celery/garlic mixture in oil for about 10 minutes to really soften.
  • Then add these ingredients: shredded cooked chicken, (1 oz) packet ranch dressing mix (dry powder packet), 4 cups chicken broth, ¾ cup Buffalo sauce, 14.5 oz can diced tomatoes drained, and 15.5 oz can great northern beans drained increase the heat and bring to a boil, then reduce the heat to low and simmer for 10 minutes.
  • Then remove from the heat and stir in 1 cup frozen corn (heaping), ⅓ cup cilantro chopped, 8 oz block cream cheese and 1 T honey.
  • Stir until the cream cheese is completely mixed in.
Did you make this recipe?Connect with me and let me know by commenting below!
Jump to Comments
Serving: 1serving | Calories: 307kcal | Carbohydrates: 35g | Protein: 30g | Fat: 6g | Saturated Fat: 1g | Polyunsaturated Fat: 1g | Monounsaturated Fat: 2g | Trans Fat: 0.02g | Cholesterol: 56mg | Sodium: 1985mg | Potassium: 1014mg | Fiber: 6g | Sugar: 9g | Vitamin A: 1041IU | Vitamin C: 45mg | Calcium: 220mg | Iron: 3mg

Weekly Meal Plan & Grocery List #11

March 27, 2019 by Susie Weinrich Leave a Comment

Free Meal Plan with Grocery List pin image

Planning dinner for your family for an entire week can be hard! What should we eat for dinner? What do I need to buy at the store? Let me answer both of those questions with my free weekly meal plan including a printable grocery list (and bonus leftover re-do ideas)!

FREE FAMILY MEAL PLAN

Your family needs to eat, and the job of feeding them lands squarely on your shoulders.

The key to making this job easy is MEAL PLANNING!

Plan all your meals for the week, write out your grocery list, and then head to the store to buy the groceries. Sounds easy enough, but I think a lot of us just end up at the grocery store buying the same things week after week, and then we get home and say "I have nothing to cook for dinner!"

[Read more…]

Easy Cornbread

March 21, 2019 by Susie Weinrich 126 Comments

a piece of best ever cornbread on a white plate being drizzled with syrup

This is going to go one of two ways…. you are going to LOVE this recipe and everyone around you is going to LOVE it and beg for the recipe. OR you are going to say “this isn’t cornbread”, not make the recipe and everyone is going to miss out. What path are you taking??

Cornbread made with a box of yellow cake mix and two jiffy corn muffin mixes, cooling on a black cooling rack

This cornbread is so easy and so perfect. Grab a box of yellow cake mix and 2 boxes of Jiffy cornbread mix. It’s everything you love in a good cornbread- it’s not too dry or crumbly, it’s fluffy, and has great corn flavor. Add some delicious Honey Butter and this cornbread makes an amazing side dish!

It is the moist cornbread that you have been searching for! This recipe doesn’t need a lot of explanation, it’s just easy and good! It will become your go-to corn bread recipe.

[feast_advanced_jump_to]

Why You’ll Love It

If you chose to continue with the recipe, this is why you are going to be so happy you did…

  1. It is super easy to make and basically foolproof.
  2. The flavor is outstanding without a ton of work.
  3. The cornbread has a great fluffy texture and isn’t over dry or crumbly.
  4. It’s the perfect mix of sweet and savory.

How to Make Sweet Cornbread

You are going to love how easy this is…

  1. Preheat your oven to 350 degrees. The next couple steps could not be easier.
  2. Simply pour all the ingredients together in a large mixing bowl:
  • 1 box Betty Crocker Yellow Cake Mix
  • 2 boxes Jiffy Corn Muffin Mix
  • ½ cup vegetable oil
  • 1 cup water
  • ⅔ cup milk
  • 5 eggs
  1. Stir everything by hand just until it is combined.
  2. Prepare a 9×13 baking pan with baking spray or oil.
  3. Pour the mix in and bake in the preheated oven for 30-35 minutes. Easy Peasy!
Best Ever Cornbread cut into slices

Storing & Freezing

Room temperature: Once the cornbread is completely cool, cover the pan tightly with foil or plastic wrap, or transfer pieces to an airtight container. It will stay moist and fresh on the counter for up to 3 days.

Refrigerator: For longer storage, keep it in an airtight container in the fridge for up to a week. Let it come to room temperature or warm it slightly before serving to bring back that soft texture.

Freezer: This cornbread freezes wonderfully. Wrap individual pieces in plastic wrap, then place them in a freezer bag or airtight container for up to 3 months. Thaw overnight in the fridge or at room temperature. Reheat for the best texture – warm a piece in the microwave for 15 to 20 seconds, or heat the whole pan, covered with foil, in a 300 degree oven for about 10 minutes.

Ideas for Serving Sweet Cornbread

  • Top with honey and fresh sliced strawberries for a sweet breakfast.
  • Serve as a pancake substitute for breakfast and top with maple syrup.
  • Perfect side dish for Skillet Dirty Rice & Beans.
  • Serve it with Classic Chili or really any of the Mom’s Dinner Chili Recipes and crumble it into the chili instead of crackers.
  • Perfect snack with a pat of butter and a little honey! OR this amazing Honey Butter.
a piece of best ever cornbread on a white plate being drizzled with syrup

More Cornbread Recipes

If you love cornbread then you should definitely check out some more of these recipes:

  • cornbread with a sliced turned to the side and covered in honey
    Homemade Buttermilk Cornbread
  • basket of corn muffins
    Sweet Cornbread Muffins
  • an oval casserole dish with baked cornbread stuffing and a spoon
    Savory Cornbread Stuffing

Susie leaning on the kitchen counter

WATCH SUSIE ON FOOD NETWORK!

⭐⭐⭐⭐⭐

The new gameshow, 100 Cooks, premieres on Food Network June 7th, 2026 at 9est/8cst. I hope you will tune in!

Best Ever Cornbread cut into slices

Cornbread with Cake Mix

An unbelievably tasty and moist cornbread that is made with 2 corn bread mixes and 1 yellow cake mix for a perfect balance of sweet and savory. 
4.72 from 69 votes
Print Pin Rate Save Saved!
Prep Time: 10 minutes minutes
Cook Time: 35 minutes minutes
Total Time: 45 minutes minutes
Servings: 1 cake
Author: Susie Weinrich

Ingredients

  • 1 Betty Crocker yellow cake mix**
  • 1 cup water
  • ½ cup vegetable oil
  • 2 boxes Jiffy Corn Muffin Mix
  • ⅔ cup milk
  • 5 eggs

Serving

  • Optionally make a spread for serving- - Honey Butter

Instructions
 

  • Preheat the oven to 350.
  • Prepare a 9×13 pan with baking spray or oil. You can also use 2- 8×8 or 9×9 pans. (If you use a glass pan you will probably cook the entire 35 minutes, in a dark/non-stick pan start checking around 27-30 minutes.)
  • Mix all ingredients by hand, just until combined. Pour mixture into the prepared 9×13 pan.
  • Bake for 30-35 minutes until the top is golden and a toothpick inserted into the center comes out clean.

Recipe Tips and Notes:

You can use any brand yellow cake mix that calls for 3 eggs, 1 cup water, and ½ cup oil.
Did you make this recipe?Connect with me and let me know by commenting below!
Jump to Comments
  • « Previous Page
  • 1
  • …
  • 54
  • 55
  • 56
  • 57
  • 58
  • …
  • 65
  • Next Page »
Susie in the kitchen with an apron on getting ready to cook

Meet The Author:

Susie Weinrich is a professional recipe developer specializing in classic Midwest cooking, recently seen on Food Network's 100 Cooks. Her thoroughly tested recipes and step-by-step guides give home cooks real confidence in the kitchen.

YOU will feel like a huge success at dinner time with any of the simple recipes on Mom's Dinner! Read More

Helpful Meal Planning Resources

  • a table with white place settings and green garland
    Easy Meals for House Guests
  • a round table with a large family eating dinner
    30 Easy Meals for Large Family Vacations & Gatherings
woman owned small business certificate by Sertify

Amazing New Recipes

  • Scoop of broccoli cheese casserole coming out of a baking dish.
    Down Home Broccoli and Cheese Casserole
  • Close up of a fresh made fried pork tenderloin sandwich topped with onion rings, pickles, horseradish mayo and lettuce.
    Iowa Fried Pork Tenderloin Sandwiches
  • two kids jumping in a lake off the dock at sunset
    Dinners for a Week at the Lake House
  • Tuna Noodle Casserole in a white dish being spooned out of the baking pan
    Mom’s Tuna Noodle Casserole

Footer

^ back to top

About

  • Susie Weinrich
  • Privacy Policy
  • Accessibility Policy

Contact

  • Sign Up! for emails
  • Contact Me!
  • Join Me On YouTube

Recipes

  • Recipe By Category
  • Instant Pot Recipes
  • Dinner Recipes

Copyright © 2026 Mom's Dinner

Rate & Review This Recipe

Your vote:


A rating is required
A name is required
An email is required