Mom's Dinner

  • Home
  • All Recipes
  • Instant Pot
    • All Instant Pot Recipes
    • Instant Pot Soup
    • Instant Pot Beef
    • Instant Pot Chicken
    • Instant Pot Pork
    • Instant Pot Turkey
    • Instant Pot Pasta
    • Instant Pot Vegetarian
  • Dinner
    • Beef
    • Chicken
    • Pork
    • Turkey
    • Fish & Seafood
    • Mexican
    • Pasta
    • Vegetarian
  • Subscribe
menu icon
go to homepage
  • RECIPES
  • DINNER
  • ABOUT
  • SUBSCRIBE

subscribe
search icon
Homepage link
  • RECIPES
  • DINNER
  • ABOUT
  • SUBSCRIBE

ร—
You are here: Home

Cookies and Cream Key Lime Ice Cream

May 1, 2018 by Susie Weinrich 15 Comments

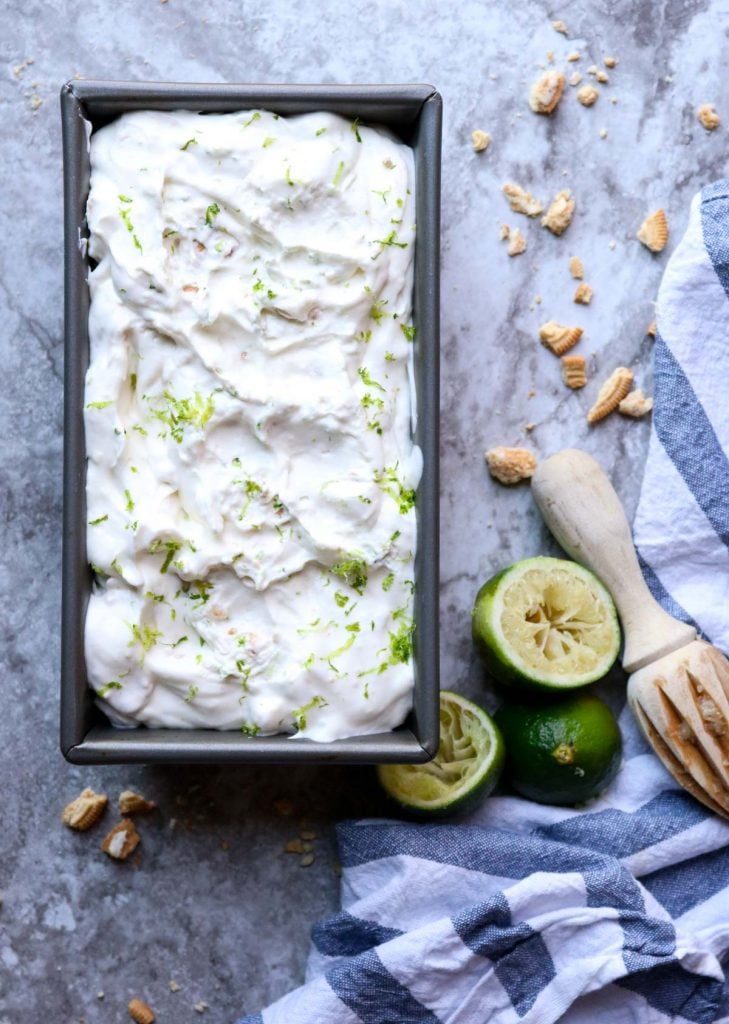
a loaf pan filled with key lime ice cream

You scream, I scream, we all scream for ice cream…..especially if it is Cookies and Cream Key Lime Ice Cream! It is the perfect dessert for adults and kids alike!

This is a super delicious dessert. It is full of refreshing citrus lime mixed with sweet cream, a touch of sugar and chunks of crushed vanilla cream cookies. A perfect summer twist on traditional cookies and cream ice cream.

No Churn Key Lime Cookies and Cream Ice Cream in a rectangle pan with limes and cookie chunks on the counter momsdinner.net

Best part is that you do NOT need ice cream churning equipment to get the job done. Yet you still get the creamy sweet goodness of traditional ice cream. All you need is a stand mixer or hand held mixer with a whisk attachment, and a freezer.

This is a great dessert to serve after a delicious Mexican Dinner! Pairs perfectly with margaritas, chips and salsa and enchiladas!

Key Limes

Now I KNOW that I used the words “key lime” in the title of this dessert, yet it doesn’t call for key limes specifically. It is really just to convey the flavor of traditional key lime pie.

Key limes are not something I am interested in chasing down. Especially when this dessert is just as delish with regular old limes.

key lime ice cream with vanilla oreos being scooped

However, if you are able to find Key Limes, by all means use them. But don’t beat yourself up if you have to use a standard lime! It’s what I use and everyone loves itโ™ฅย 

How to Make No Churn Cookies and Cream Key Lime Ice Cream

Whisk the heavy whipping cream with a stand mixer or hand held mixer with the whisk attachment, on medium high speed, until you have stiff peaks.

What Are Stiff Peaks

Stiff peaks is when you pull the beater out of the cream and the mound that pulls out holds its shape and has a sharp tip.

whisk attachment with whipped cream sticking to it to show stiff peaks

Lower the blender speed to medium low and sprinkle in the powdered sugar, drizzle in the sweetened condensed milk, pour in the lime juice, and the lime zest. Once it is all incorporated stop whisking.

In a large plastic baggie, crush the cookies until you have smaller bite size pieces. Do not crush it to dust, you will want some cookie chunks in your ice cream. A rolling pin, smooth meat mallet, or small frying panย  will all work great to pound the cookies into pieces.

vanilla oreos crushed up

With a spatula fold the cookies into the cream mixture.

Pour the mixture into a glass or metal loaf pan. Cover the pan with plastic wrap and place in the freezer.

Freeze for 6+ hours.

Done!

Cookies and Cream Key Lime Ice Cream Toppings

Here are six options for topping your Key Lime Ice Cream:

  • Bare Naked! Just keep it as is, simple and delish.
  • A little dollop of whipped cream...
  • Sprinkle on some extra lime zest…
  • Add some rainbow sprinkles…
  • Crush the extra cookies and sprinkle over the top…
  • Get super crazy and do all four….

More No Bake Dessert Recipes

  • a lemonade icebox pie on a plate with raspberry garnish
    Lemonade Icebox Pie with Raspberries
  • chocolate no bake cookie on a white tray
    Fudgy Chocolate No Bake Cookies
  • No Churn Mango Ice Cream
  • No-Bake Chocolate Pot de Crรจme
a loaf pan filled with key lime ice cream

Cookies and Cream Key Lime Ice Cream – No Churn!

An easy and refreshing, sweet key lime ice cream with chunks of vanilla cream cookies. No special ice cream making equipment needed (no churn).
5 from 7 votes
Print Pin Rate Save Saved!
Prep Time: 20 minutes minutes
Cook Time: 0 minutes minutes
Freeze at least: 6 hours hours
Servings: 10 servings
Author: Susie Weinrich

Ingredients

  • 2 cups heavy whipping cream - (cold)
  • 3 tablespoon powdered sugar
  • 14 ounce can sweetened condensed milk
  • 2 tablespoon lime zest - (about 2-3 limes)
  • ยฝ cup fresh lime juice - (4-5 limes)
  • 10-12 vanilla creme cookie sandwiches - (example: Vanilla Oreos)

Instructions
 

  • Using a stand mixer or hand held mixer with the whisk attachment, on medium high speed, whip the cold heavy whipping cream until you have firm peaks.
    Firm peaks are when you pull the whisk out of the cream and a peak with a sharp tip forms and holds its shape. This will take 2-3 minutes.
    2 cups heavy whipping cream
  • Turn the mixer to low speed and sprinkle in the powdered sugar.
    3 Tbsp powdered sugar
  • Next slowly pour in the sweetened condensed milk, whisk until it is combined, about 20 seconds.
    Add the lime juice and lime zest. Whisk for an additional 20 seconds. Set aside.
    14 ounce can sweetened condensed milk, 2 Tbsp lime zest , ยฝ cup fresh lime juice
  • Place the cookies in a large sealable plastic baggie. Crush the cookies- using a rolling pin, smooth meat mallet, or small frying pan works great.
    Do not crush it to dust, just to smaller bite sized pieces. Like the size of a nickel or dime.
    10-12 vanilla creme cookie sandwiches
  • With a spatula fold the cookies into the cream mixture. 
  • Gently pour/scrape the mixture into a freezer safe glass or metal loaf pan. Cover and freeze for 6+ hours.

Serving

  • Scoop the frozen ice cream out into serving bowls or ice cream cone. Add toppings of your choosing: whipped cream, sprinkles, lime zest, crushed cookies, or whole cookies.
Did you make this recipe?Connect with me and let me know by commenting below!
Jump to Comments

Instant Pot Burrito Bowls

April 30, 2018 by Susie Weinrich 15 Comments

Instant Pot Burrito Bowls momsdinner.net

This post contains affiliate links. Thank you for supporting Mom's Dinner at no cost to you!

Instant Pot Burrito Bowls are perfuming my kitchen, like a savory potpourri. I wish I could scoop you all up and put you in my kitchen right now.

I just popped the vent open on my Instant Pot and my whole kitchen smells like heaven with scents of steak, chili powder, cumin, onion, and sweet carrot. What a delicious blend!

rice, steak, black beans, corn, and limes in a white bowl.

If you love Mexican food, burrito bowls, and your Instant Pot like I do, then this recipe for Instant Pot Burrito Bowls is the perfect recipe for your dinner this week.

These burrito bowls are full of fork tender steak, seasoned with flavors of cumin, chili powder, garlic and onions, mixed with a sweet, salty, & spicy blender sauce. Served with corn and black beans, over a bed of rice flavored with chili powder, tomatoes and green chilies.

Squeeze a few wedges of lime over top and scoop in a generous portion of spicy pickled jalapenos and you have a drool worthy dinner!

[Read more…]

Friday Gratitude- Google & Friday 4.27.18

April 27, 2018 by Susie Weinrich Leave a Comment

Mom's Dinner, Friday Gratitude momsdinner.net

Happy Friday everyone! It is a beautiful day here is KC. The sky is blue and the sun is shining. Both the kids are at school and I am on the back porch with my computer, a cup of coffee and a great podcast playing in the background. All things to be grateful for, for sure. What a great day!

Mom's Dinner, Friday Gratitude momsdinner.net

Here are a few more moments of gratitude from this past week: [Read more…]

Friday Gratitude- Leadership & Dreams 4.20.18

April 20, 2018 by Susie Weinrich 2 Comments

Girl Scout Day Camp

I wasn’t sure I was going to get a Friday Gratitude in this week! But then I remembered some great advice that I got a couple weeks ago…. it doesn’t have to be perfect. So this one will be short and sweet. Not perfect, but done.

Here are a few moments of gratitude from this week:

Leadership

This week I did my mommy duty and volunteered to help with my daughter’s Girl Scout camp. They were out of school on Monday so the 4th grade GS troop planned a preview camp for the K-1st grade Brownies from the same school.

Girl Scout Day Camp

It was so great to watch the 4th grade girls become little leaders and take pride in their rolls. They guided the girls from station to station and entertained them in between. They made sure the little ones were comfortable and safe. It was an awesome learning experience for them. [Read more…]

Best Ever Grapefruit Margarita Pitcher

April 19, 2018 by Susie Weinrich 10 Comments

a glass of grapefruit margarita with a salty plate in the background

This is truly the Best Ever Grapefruit Margarita! Not only is it super easy to make with simple ingredients, it makes a whole pitcher! When you have a margarita, you more than likely are having more than one OR are sharing with friends, and a pitcher of Grapefruit Margaritas makes that so much easier.

a glass of grapefruit margarita with a salty rim and a fresh grapefruit wedge

This recipe just takes 5 simple ingredients that get poured in a pitcher and stirred together. No making simple syrup or squeezing 25 limes!

Some call this a “beer margarita” since it uses a bottle of beer.

Another great grapefruit cocktail is the Paloma. Check out this Rosemary Paloma on Mom’s Dinner.

Why This Recipe Works

  • It is the perfect balance of sweet, salty and a hint of bitter.
  • The grapefruit flavor is a nice departure from a traditional lime margarita.
  • The clean salty flavor of silver tequila mixes perfectly with the lime and grapefruit flavors.
  • Squirt soda not only adds some bubbles, but a nice grapefruit flavor without being overly sweet OR tasting like diet soda, like a Fresca might.

Ingredients

You only need 5 simple ingredients to make a pitcher of Grapefruit Margaritas, and then a little sugar, salt and fresh grapefruit for cocktail glass garnishes.

  • silver tequila
  • frozen limeade, slightly thawed
  • grapefruit juice
  • light beer
  • Squirt soda

Squirt Soda – you can find Squirt in the soda aisle at the grocery store. It is a grapefruit flavored soda that is not overly sweet. It is the perfect soda for this recipe!

How to Make A Pitcher of Grapefruit Margaritas

Pour the semi thawed limeade into a large glass pitcher.

Pro Bartender Tip: Now you can use the 12 oz. empty limeade can to measure your other ingredients.

  • Fill it with silver tequila (12 oz.), pour in.
  • Fill half way with grapefruit juice (6 oz.), add to the pitcher.
  • Finally fill it one and a half times with the Squirt soda (18 oz.) and mix it into the pitcher.

Pour in the bottle of beer.

Stir until the limeade is completely dissolved and it is well combined.

a pitcher filled with grapefruit margarita

On a flat plate mix equal parts white sugar and kosher salt. Rub the rim of your glass with a fresh grapefruit wedge. The juice will help the sugar/salt adhere.

Dip the rim of the glass into the sugar/salt mixture until you have the desired amount on the glass rim… and the desired amount is a lot…trust me, you want a lot!

Add a lot of ice to the glass. Squeeze a wedge of grapefruit over the ice. Now pour in the Best Ever Grapefruit Margarita, sit back to enjoy your cocktail.

Less Sweetness

You have a couple options to lessen the sweetness if you like it less sugary:

  • Top each glass off with a little grapefruit flavored soda water. Doing this will allow each person to decide their level of sweetness without diluting the pitcher.
  • Add a 12 oz can of grapefruit flavored soda water to the pitcher. This will change the flavor of the pitcher (and the strength of the margs), so maybe add half the can then give it a taste and then add more as desired.
  • Replace the Squirt soda with a 12 oz. can of grapefruit soda water.
overhead view of a margarita showing the salty rim and garnish

Make Ahead

If you want to make this margarita pitcher a couple hours ahead, simply mix the limeade, grapefruit juice and tequila together. Pop it in the fridge.

Right before serving add the Squirt soda and beer.

Make it a Party!

If you are serving this Grapefruit Margarita Pitcher at a party, add these recipes to complete your planning:

  • two hands serving a bowl of Pico de Gallo
    Simple Pico de Gallo
  • a bowl of fresh avocado guacamole with a chip dipping in
    Holy Guacamole, That’s Good Guac
  • homemade salsa in a bowl with cilantro and limes
    Restaurant Style Salsa
  • Queso dip on a tortilla chip
    Instant Pot Queso Blanco Dip

Other Margarita Recipes

If you love a tequila cocktail then you are in the right place! Here are a few other margarita recipes you should check out!

  • pomegranate margarita in a tall glass with orange and arils
    Pomegranate Margarita
  • Apple Cider Margarita Cocktail in a glass with apple slice and cinnamon sitcks
    Spiced Apple Cider Margarita
  • a watermelon margarita in a stemmed glass with a sugar-salt rim and a lime garnish
    Watermelon Margarita
  • Cucumber margarita in a glass with a cucumber rosette garnish
    Refreshing Cucumber Margarita

Susie leaning on the kitchen counter

WATCH SUSIE ON FOOD NETWORK!

โญโญโญโญโญ

The new gameshow, 100 Cooks, premieres on Food Network June 7th, 2026 at 9est/8cst. I hope you will tune in!

a glass of grapefruit margarita with a salty plate in the background

Grapefruit Margarita Pitcher + Video

Refreshing and super tasty grapefruit margaritas using simple ingredients. The recipe makes a pitcher so it is perfect for parties!
5 from 3 votes
Print Pin Rate Save Saved!
Prep Time: 10 minutes minutes
Cook Time: 0 minutes minutes
Servings: 6 margaritas
Calories: 248kcal
Author: Susie Weinrich

Ingredients

  • 12 ounces frozen limeade concentrate - semi thawed
  • 12 ounces silver tequila
  • 12 ounce bottled beer - a light beer works best. Example- bud light, miller light, coors light
  • 18 ounces Squirt soda
  • 6 oz Grapefruit Juice

Rim Garnish

  • 2 tablespoons kosher salt
  • 2 tablespoons white sugar
  • fresh grapefruit cut into wedges

Instructions
 

  • In a large glass pitcher mix together the first 5 ingredients until the limeade is completely melted and all the ingredients are well combined.
    Pro Tip: You can use the emptied limeade can to measure the tequila and the soda.

Rim Garnish

  • On a flat plate mix together the sugar and kosher salt. 

Serving

  • Rub the rim of each glass with a wedge of lime or grapefruit. Tap the rim of the glass into the sugar/salt garnish plate. Making sure to cover the entire rim of the glass. Add ice to the glass. Squeeze a grapefruit wedge into the glass, and leave the wedge in the glass. Pour the Grapefruit Margarita into the glass and serve.ย 
    Pro Tip: You can add ice to the pitcher if you are serving the entire pitcher immediately. Otherwise add the ice to each individual glass. That way the pitcher of Grapefruit Margaritas will not get watered down.

Recipe Tips and Notes:

Make Ahead: If you plan to make your pitcher of grapefruit margs ahead of time. Add the limeade, tequila and grapefruit juice to the pitcher. Pop it in the fridge for a couple hours. Right before serving add the soda and beer.ย 
Less Sweetness:ย Choose one of the three options below to lessen the sugar in your grapefruit margaritas.
  • Top each glass off with a little grapefruit flavored soda water. Doing this will allow each person to decide their level of sweetness without diluting the pitcher.
  • Add a 12 oz can of grapefruit flavored soda water to the pitcher. This will change the flavor of the pitcher (and the strength of the margs), so maybe add half the can then give it a taste and then add more as desired.
  • Replace the Squirt soda with a 12 oz. can of grapefruit soda water.
Did you make this recipe?Connect with me and let me know by commenting below!
Jump to Comments
Serving: 1margarita | Calories: 248kcal | Carbohydrates: 26g | Protein: 1g | Fat: 1g | Sodium: 2339mg | Potassium: 69mg | Fiber: 1g | Sugar: 23g | Vitamin A: 2IU | Vitamin C: 9mg | Calcium: 9mg | Iron: 1mg

Easy Chicken Marinade + Grilling Tips

April 17, 2018 by Susie Weinrich 11 Comments

grilled marinated chicken breasts on a plate of veggies

Creating a quick and flavorful Chicken Marinade is effortless with the simple combination of an Italian dressing packet, fresh lemon, and garlic. By mixing these ingredients together, you’ll infuse the chicken with a tangy and herbaceous profile, perfect for grilling, baking, or sautรฉing.

grilled marinated chicken breasts on a plate of veggies

This is no wimpy marinade! It will seep into the center of your chicken and flavor it all the way thru, end to end, not just the first couple bites.

Marinating the chicken not only tenderizes the meat but also marinates it with a delicious taste that will elevate any dish with minimal effort. Serve your grilled chicken with a side of horseradish cream sauce, grilled veggies and crispy potatoes.

Ingredients

Good Seasonings Zesty Italian Dressing Packet: IMO this is the Swiss army knife of the kitchen! It is not only good for making Italian dressing and marinating chicken, it makes an amazing all-in-one seasoning for recipes like:

  • Creamy Chicken and Noodles
  • Italian Meatloaf
  • Cheese Tortellini Pasta Salad
Italian Dressing Season Packet

Lemon Zest and Juice: use both the zest and the juice from a lemon to get the most flavor! Just make sure to zest the lemon and then juice it!

Garlic: fresh garlic is a must in this chicken marinade. We crush the garlic instead of mincing or chopping, that way you can remove it before grilling the chicken. Minced or chopped garlic can burn on the grill quickly.

Olive Oil- not only helps deliver the marinade flavors all of the chicken, it is a good non-stick ingredient for grilling your chicken.

How to Make Marinated Chicken

Before you get started…

make sure you have at least 12-24 hours to let your chicken marinate in the fridge. This is the ideal amount of time to get the most flavor into your chicken.

  1. Mix Seasonings
  2. In a glass baking dish, either 9×9 or 9×13, or a Ziploc baggie, combine the olive oil, Italian Dressing Seasoning packet, lemon zest and all the lemon juice.

  3. Add Garlic and Chicken
  4. Crush the garlic cloves with the flat side of a knife, do not chop or mince the garlic.

    Marinating with Garlic

    By crushing the garlic instead of mincing it, you are able to get all the garlic flavor in the marinade but are still able to remove it before grilling. Minced garlic will burn on the grill quickly!

    Add the crushed garlic cloves, squeezed lemon halves, and chicken into the marinade. Stir it around so that the marinade coats the chicken completely on all sides.

    raw chicken marinating in a glass dish with two lemons momsdinner.net
  5. Refrigerate
  6. Cover the dish with foil or plastic wrap and refrigerate for 12-48 hours.ย  I like to flip the chicken in the pan at least one time while it is marinating to ensure the chicken is completely marinated thru.

    Before grilling remove the garlic cloves and any lemon seeds that have stuck to the chicken.

Tips for Grilling Marinated Chicken Breasts

Whether you are using charcoal or gas, grilling is the tastiest way to prepare chicken.

Easy Chicken Marinade momsdinner.net

Here are a few tips to ensure your chicken is grilled to perfection:

  1. ย If you are using a charcoal grill, try using a charcoal chimney like this one from Amazon. It helps you prepare your charcoal without using any lighter fluid or chemicals. You simply fill the top of the chimney with charcoal, light some paper in the bottom portion, and wait for the coals on the top to turn grey/white hot, about 15 minutes. Then you dump the charcoal out into your grill and you are ready to cook.
  2. Spread your charcoal into a flat thick layer across the bottom of the grill, giving you an even medium heat.
  3. If you are cooking with gas, set your grill to medium heat, around 425ยฐ.
  4. I like to cook my chicken for 7 minutes on the first side, then flip to the other side, and grill for an additional 6 minutes.
  5. When your chicken is cooked thru remove it from the grill and let it rest, uncovered, for 5 minutes before slicing or eating. This will redistribute all the juices into the chicken.

Cooking Chicken Safely

Make sure your chicken is cooked all the way thru at the thickest part. Using a meat thermometer test that the thickest part is 165ยฐF.

Grilled Marinated Chicken for Dinner

Once you have grilled your marinated chicken the possibilities are endless. 101 chicken dinners, anyone?!

Here are a few of my favorites:

  1. This recipe for Grilled Chicken & Vegetables with a Horseradish Cream Sauce is a perfect match for this marinade recipe.
  2. I will never turn down a grilled chicken sandwich! Grab some brioche buns, add a grilled marinated chicken breast, lettuce, tomato, and some mayo or this Horseradish Sauce recipe – Heaven!
  3. Slice the grilled marinated chicken and add to a green salad. This Chicken Bacon and Avocado Salad fromย Cafe Delites would be a great salad for this grilled chicken recipe.

More Marinated Chicken Recipes

  • Marinated Chicken Spiedini with Amogio
  • two grilled chicken breasts
    Grilled Buttermilk Chicken Recipe
grilled marinated chicken breasts on a plate of veggies

Easy Chicken Marinade Recipe

An easy recipe to marinate your chicken before grilling. It comes together in minutes with easy to find, inexpensive ingredients.
5 from 6 votes
Print Pin Rate Save Saved!
Prep Time: 5 minutes minutes
Cook Time: 0 minutes minutes
Marinating: 1 day day
Servings: 4 -6 chicken breasts
Author: Susie Weinrich

Ingredients

  • 4-6 fresh boneless skinless chicken breasts
  • 0.7 ounce Good Seasonings Italian Dressing Packet
  • 3 tablespoon olive oil
  • zest of 1 lemon
  • Juice of 1 fresh lemon - do not throw away, you can add the whole lemon to the marinade
  • 4 plump garlic cloves - smashed
  • black pepper to taste

Instructions
 

  • In a large 9×9 or 9×13 glass baking dish or Ziploc baggie add the Italian Seasoning packet, olive oil, and the zest and all the juice of 1 lemon. Stir to combine
    0.7 ounce Good Seasonings Italian Dressing Packet, 3 Tbsp olive oil, zest of 1 lemon, Juice of 1 fresh lemon
  • Smash the garlic cloves with the side of a large knife, do not mince or chop the garlic, you will want to be able to remove the garlic before grilling.
    4 plump garlic cloves
  • Add the garlic, whole lemons, dash of black pepper and chicken to the olive oil mixture. Stir to coat the chicken with the marinade.
    4-6 fresh boneless skinless chicken breasts, black pepper to taste
  • Cover the pan and refrigerate for 12-24 hours, turning the chicken once, about half way thru the marinating time.

Grilling

  • Remove the chicken from the marinade, making sure to remove the whole garlic cloves and any lemon seeds that have stuck to the chicken.
  • Grill the chicken over medium direct heat for approx. 7 minutes on the first side and 6 minutes on the second side.
    Using a meat thermometer check that the chickens internal temp, at the thickest part, is 165โ„‰ to know it is safe to eat.
  • Let the chicken rest, uncovered, for 5 minutes before cutting or eating.
Did you make this recipe?Connect with me and let me know by commenting below!
Jump to Comments

Friday Gratitude- Hairy Armpit & Spring Snow 4.13.18

April 13, 2018 by Susie Weinrich 2 Comments

Kyle playing basketball

We had a snow day and we had an 80ยฐ day, our weather is all over the place here in KC. But, I can feel that we are moving closer to spring. The trees are starting to bloom and the flowers are budding.

Here are the moments that made my week a little brighter:

Instagram

I CELEBRATED making it to 300 followers on Instagram, which I know is not that many. But it’s a lot more than 0, right!? Now on to 300,000….

Instagram Profile

[Read more…]

Crispy Chicken with Goat Cheese & Sun Dried Tomatoes

April 11, 2018 by Susie Weinrich 77 Comments

goat cheese chicken with panko on top

Say the words “goat cheese” and I am all in! This recipe for Crispy Chicken with Goat Cheese & Sun Dried Tomatoes takes your plain old chicken to flavor country! It is a boneless skinless chicken breast, pounded thin, and filled with a mixture of goat cheese, mayo, garlic, and sundried tomatoes. It then gets rolled up and topped with a crunchy panko breading mixture.

Crispy Chicken with Goat Cheese & Sun Dried Tomatoes on a white plate momdinner.net

My husband does not feel the same way as I do about goat cheese. He wants nothing to do with it…but he loves fish and it’s not my favorite- so we are even!

Last time he was out of town I made a couple of these and ate them the entire time he was gone. And I loved every single bite!

How to Make Crispy Chicken with Goat Cheese & Sun Dried Tomatoes

If you love watching cooking shows you can pop over to Pinterest and watch me make this in a 30 minute episode of Pin TV!

chicken topped with panko bread crumbs

Pounding The Chicken

You are going to start by pounding your chicken breasts very thin, about ยผ inch. I like to do this one of two ways:

  • Place the chicken in a Ziplock bag on a hard surface. I use a rolling pin, or meat tenderizing mallet like the one linked here. Do this one breast at a time.
  • Place the chicken on a solid cutting board. Butterfly it open by cutting it lengthwise, cover the top of the chicken with plastic wrap. Pound the chicken to the desired thickness using a meat mallet or wooden rolling pin.
raw chicken pounded thin

Crispy Chicken Filling

Make the goat cheese and sun dried tomato filling by mixing together the mayo, goat cheese (it will be easier to mix the goat cheese if it is not straight out of the fridge), fresh garlic, sun dried tomatoes, basil, and a pinch of salt & pepper. You can set that aside for now.

Filling the Chicken

Lay the chicken breasts flat and spread a few tablespoons of the goat cheese mixture over the chicken, covering about ยพ of the surface. Roll the chicken breast over the filling, lightly, making sure the filling does not squeeze out of the sides of the roll up.

Place the breasts seam side down on the sheet pan.

raw chicken pounded thin with goat cheese filling spread in the middle momsdinner.net

It is ok if some of the cheese mixture gets on the pan while you are rolling them up. It is a messy process, but I promise it turns out beautiful.

raw chicken rolled with goat cheese filling, on a sheet pan lined with foil momdinner.net

Some of the filling will spill out during baking process and it gets all golden and gooey…. those are the super delicious parts you will want to make sure and serve with the chicken…. or sop up with a piece of bread.

Time to Bake

Now season each chicken roll up with a little olive oil and kosher salt and pepper and pop it in the oven for 15 minutes.

While that cooks you can put together the super delish crispy topping. It couldn’t be easier, you stir together the 4 ingredients and season with a little salt and pepper. Make sure the mayo is distributed evenly in the panko bread crumbs.

Pull the par cooked chicken out of the oven and top each breast generously with a HEAP of the panko bread crumb mixture.

chicken on a baking sheet topped with panko bread crumbs

Carefully put the chicken back into the oven for an additional 10-15 minutes until the topping is golden brown and crunchy.

The final cooking time depends on how thick your chicken is! Make sure your chicken reaches 165 degrees internal temp before removing from the oven.

Bread Crumbs vs. Panko Bread Crumbs

Panko bread crumbs are the traditional bread crumbs bigger brother. Where traditional bread crumbs are processed into a finer powder, the panko crumbs are a bigger, drier, and crunchier.

chicken roll up filled with goat cheese and topped with crispy panko

Can I use regular breadcrumbs instead of panko bread crumbs? The answer is unfortunately no, for this recipe. I am sure there are a lot of recipes that the two are interchangeable but this is not one of them. You want the light crispy texture of the panko crumbs.

Make This Recipe Your Own

Here are a few additions you could try to change this recipe:

  • Add toasted pine nuts to the goat cheese mixture for a little nutty crunch.
  • Get your greens by adding spinach. I would recommend using frozen- thawed spinach that has been completely drained of liquid. Then add it to the goat cheese mixture.
  • Put a few chopped artichokes in the goat cheese mixture.

Side Dish Ideas

Crispy Chicken with Goat Cheese and Sun Dried Tomatoes is pretty filling so no need to go crazy with the side items. I like to make a Caesar Salad or Big Italian Salad and my Oven Roasted Asparagus or Green Beans.

More Delicious Chicken Dinner Ideas

  • two grilled chicken breasts
    Grilled Buttermilk Chicken Recipe
  • chicken parmesan in a skillet
    Crispy Chicken Parmesan
  • Caesar Chicken Bake in a glass baking pan
    Creamy Baked Caesar Chicken
  • grilled chicken topped with cream sauce and grilled veggies
    Grilled Chicken & Vegetables with Horseradish Cream Sauce

Susie leaning on the kitchen counter

WATCH SUSIE ON FOOD NETWORK!

โญโญโญโญโญ

The new gameshow, 100 Cooks, premieres on Food Network June 7th, 2026 at 9est/8cst. I hope you will tune in!

goat cheese chicken with panko on top

Crispy Chicken with Goat Cheese & Sun Dried Tomatoes

A delicious baked chicken breast stuffed with a tasty goat cheese and sun dried tomato filling, topped with a crunchy panko breading.ย 
Watch me make this recipe is a 30 minute episode of Pinterest TV.
4.83 from 47 votes
Print Pin Rate Save Saved!
Prep Time: 20 minutes minutes
Cook Time: 25 minutes minutes
Total Time: 45 minutes minutes
Servings: 4 people
Calories: 541kcal
Author: Susie Weinrich

Equipment

  • Large rimmed baking sheet
  • meat mallet or wooden rolling pin (something to pound the chicken thin)
  • parchment or foil

Ingredients

Chicken

  • 4 boneless skinless chicken breasts - fresh, not frozen
  • olive oil
  • kosher salt and black pepper
  • non-stick spray

Goat Cheese Filling

  • 5 ounce goat cheese log - if possible pull it out of the fridge 20 minutes early to soften
  • ยฝ cup mayonnaise
  • โ…“ cup sun dried tomatoes, packed in oil - drained and chopped
  • 1 plump garlic clove - minced
  • 1 teaspoon dried basil
  • ยฝ teaspoon kosher salt
  • black pepper

Crunchy Topping

  • 1 cup panko bread crumbs
  • 2 tablespoon mayonnaise
  • 1 teaspoon dried basil
  • pinch of salt, pepper, & red pepper flakes

Instructions
 

  • Preheat the oven to 350.
  • Cover a rimmed baking sheet with foil and spray with non-stick spray.
    non-stick spray

Prep the chicken

  • Pound the chicken breasts to about ยผ inch thickness with a meat mallet or rolling pin. Set aside.
    Pro Tip: butterfly the chicken open and then pound it thin. You can watch me do this by clicking through to the Pin TV episode.
    4 boneless skinless chicken breasts

Goat Cheese Filling

  • In a medium bowl mix together all the ingredients for the goat cheese filling. Stir until it is well combined and there are no clumps of goat cheese remaining.ย 
    5 ounce goat cheese log , ยฝ cup mayonnaise, โ…“ cup sun dried tomatoes, packed in oil, 1 plump garlic clove, 1 tsp dried basil, ยฝ tsp kosher salt, black pepper

Assembly

  • Spread a few spoonfuls of the goat cheese mixture evenly over the flattened chicken breasts, covering about ยพ of the surface.ย 
  • Lightly roll the chicken over the filling, like a burrito, try to keep all the filling inside the chicken roll.
    Lay the chicken rolls seam side down on the prepared rimmed baking sheet.
    *** This will be messy, but don't worry it will turn out beautifully!
  • Season the outside of the chicken with a drizzle of olive oil and a sprinkle of kosher salt and pepper.
    kosher salt and black pepper, olive oil

Baking

  • Place the chicken in the oven for 15 minutes.
  • Meanwhile, in a small bowl mix together the ingredients for the Crunchy Panko Topping.ย Stirring well so the mayo coats all the panko.
    1 cup panko bread crumbs , 2 tbsp mayonnaise , 1 tsp dried basil, pinch of salt, pepper, & red pepper flakes
  • Remove the chicken from the oven and top it generously with the panko bread crumb mixture. You want this to be a pile of crunchy topping on each chicken breast.
  • Carefully place the chicken back in the oven for an additional 10-15 minutes until the topping is golden brown and crispy and the chicken is cooked thru to 165ยฐ internal temp.
    ** This time will vary depending how thick your chicken is! Make sure the chicken is cooked through before serving. Check with an instant read thermometer.
  • Let the chicken rest for 5 minutes before serving.

Recipe Tips and Notes:

** When you serve this dish make sure to scrape up all the bread crumbs and filling that spills out during the cooking. Those ooey-gooey-cheesy-crispy-bread bits are the best!!!ย 
Did you make this recipe?Connect with me and let me know by commenting below!
Jump to Comments
Serving: 1serving | Calories: 541kcal | Carbohydrates: 14g | Protein: 34g | Fat: 39g | Saturated Fat: 10g | Polyunsaturated Fat: 17g | Monounsaturated Fat: 9g | Trans Fat: 0.1g | Cholesterol: 103mg | Sodium: 909mg | Potassium: 623mg | Fiber: 1g | Sugar: 1g | Vitamin A: 544IU | Vitamin C: 11mg | Calcium: 103mg | Iron: 3mg

Sausage Lasagna Roll Ups

April 9, 2018 by Susie Weinrich 16 Comments

a glass baking dish full of sausage lasagna roll ups topped with sauce and melted cheese.

Lasagna Roll Ups have all the flavors of a classic lasagna recipe, packaged in perfectly delicious little bundles. This recipe is full of Italian sausage, basil, ricotta, mozzarella cheese, and garlic, rolled up in lasagna noodles and covered in a rich tomato sauce.

A pan full of lasagna roll ups topped with sauce and melted cheese.

On Sunday we love to have a big dinner where we can all sit together. It’s the perfect way to end the weekend and it’s a nice to start the coming week. This lasagna roll up recipe is a favorite for our Sunday dinner. Everyone likes it, so we don’t have any kids crying at the table. Always a bonus!

If you want an easier weeknight lasagna check out this Skillet Lasagna, or for more of a traditional recipe pop over to this Homemade Lasagna.

[feast_advanced_jump_to]

How To Make Lasagna Roll Ups

This recipe does have a few steps, so I wouldn’t plan it on a night that is super busy or a night where you have limited time to get dinner ready. I usually plan to have this on the weekend when I can spend a little more time in the kitchen AND sitting around the dinner table.

Ground sausage browned in a skillet with a wooden spoon resting in the mixture.

Step 1

First, boil the lasagna noodles and brown the sausage (Do this at the same time…to save time). While those two items are cooking on the stove top I put together the ricotta and egg mixture.

Ricotta mixture in a glass mixing bowl.

Step 2

While those two items are cooking on the stove top I put together the ricotta and egg mixture.

showing the steps for filling and rolling lasagna roll ups.

Step 3

Spread the ricotta across each lasagna noodle, then sprinkle with sausage mixture. Roll up.

Lasagna Roll Ups: A twist on classic lasagna www.momsdinner.net

Step 4

Place them seam side down, in a pan prepared with a little marinara sauce. Pour the remaining marinara over top, and sprinkle the remaining cheese.

a pan of baked lasagna roll ups

Step 5

Cover the pan with foil and pop it in the oven! 350ยฐF for 35 minutes, remove the foil and bake another 10 minutes.

Serving Menu

Since this is a diner that we normally have on the weekend I like to make a big spread.

This dish goes great with my easyย Oven Roasted Asparagus or Green Beans, a Caesar salad , and don’t forget the garlic bread.

Don’t forget leftover lasagna is amazing too! For my family of 4, I always plan to get 2 dinners from this one recipe.

two plates with 1 lasagna roll up each and the baking pan full of lasagna roll ups to the side www.momsdinner.net

Variations on Lasagna Roll Ups

You can make this lasagna recipe to suit your family’s taste buds. Here are a few ideas to get you started:

  1. Use any kind of sausage that you would like- turkey, pork, mild, sweet, hot.
  2. If you like a strong basil flavor, stir a couple tablespoons of basil pesto into the marinara sauce.
  3. If you want more of a veggie lasagna, add a little chopped spinach. I would recommend using frozen spinach that is thawed and drained of all its liquid.ย  Stir in into the ricotta mixture.
  4. Sub ground beef for the sausage.
  5. Use your family’s favorite jarred marinara.

More Lasagna Recipes

  • lasagna skillet with a fork
    Lasagna Skillet
  • The very best lasagna recipe in a 9x13 pan
    BEST Recipe for Homemade Lasagna
  • a bowl of lasagna soup topped with ricotta cheese
    Lasagna Soup Served With Ricotta
  • Veggie Lasagna Recipe in an 8x8 or 9x9 pan
    The Ultimate Veggie Lasagna
All Lasagna Recipes on Mom’s Dinner

Susie leaning on the kitchen counter

WATCH SUSIE ON FOOD NETWORK!

โญโญโญโญโญ

The new gameshow, 100 Cooks, premieres on Food Network June 7th, 2026 at 9est/8cst. I hope you will tune in!

a glass baking dish full of sausage lasagna roll ups topped with sauce and melted cheese.

Lasagna Roll Ups Recipe

A delicious and fun twist on traditional lasagna. All the classic lasagna flavors you love: sausage, ricotta, mozzarella, and basil with a rich tomato sauce, all rolled up in a little bundle.
5 from 2 votes
Print Pin Rate Save Saved!
Prep Time: 30 minutes minutes
Cook Time: 45 minutes minutes
Total Time: 1 hour hour 15 minutes minutes
Servings: 6 people
Calories: 804kcal
Author: Susie Weinrich

Equipment

  • 9×13 baking pan

Ingredients

Sausage Mixture

  • 1 tablespoon olive oil
  • 1 lb. ground Italian sausage - mild or hot
  • 1 medium yellow onion - chopped
  • 3 plump garlic cloves - minced
  • ยฝ teaspoon dried basil

Ricotta Mixture

  • 15 oz whole milk ricotta cheese
  • 1 egg - lightly beaten
  • 1 cup mozzarella cheese
  • ยฝ cup fresh grated parmesan cheese
  • 1 teaspoon dried basil
  • ยฝ teaspoon each- garlic powder, dried oregano, kosher salt
  • ยผ teaspoon onion powder
  • pinch red pepper flakes & black pepper

Assembly

  • 10-12 lasagna noodles - I always boil extra in case some break
  • 24 oz jar marinara - use your favorite brand/flavor
  • 1 cups shredded mozzarella cheese
  • ยฝ cup fresh grated Parmesan cheese

Instructions
 

Prep

  • Preheat the oven to 350.
  • In a large pot of salted boiling water cook the lasagna noodles, according to package instructions, until al dente. Drain the noodles. Lay them flat to dry and so they are ready to stuff and roll.
    Mom's Tip: line 2 large sheet pans with paper towels- see photo- then I lay each lasagna noodle flat to dry and cool a little.
    10-12 lasagna noodles
  • While the noodles boil, brown and crumble the sausage in a large skillet with the onion and garlic. Drain excess grease and set aside to cool.
    Stir in dried basil, pinch of kosher salt, black pepper and red pepper flakes.
    1 Tbsp olive oil, 1 lb. ground Italian sausage, 1 medium yellow onion, 3 plump garlic cloves, ยฝ tsp dried basil
  • In a large bowl combine the ricotta cheese, egg, mozzarella cheese, Parmesan cheese, 1 teaspoon dried basil, garlic powder, dried oregano, salt, onion powder, pinch of red pepper flakes and black pepper to taste. Mix until it is smooth and all the ingredients are distributed evenly.
    15 oz whole milk ricotta cheese, 1 cup mozzarella cheese, ยฝ cup fresh grated parmesan cheese, 1 egg, 1 tsp dried basil, ยฝ tsp each- garlic powder, dried oregano, kosher salt, ยผ tsp onion powder, pinch red pepper flakes & black pepper

Assembly

  • Pour โ…“ of the jar of marinara into a large 9×13 casserole pan making an even layer of sauce over the bottom of the pan.
  • Time to roll the roll ups. Spread ยผ cup ricotta mixture evenly over each noodle, top with ยผ heaping cup of sausage. Starting at the end closest to you roll the noodle up gently, so the filling stays inside the noodle.
    showing the steps for filling and rolling lasagna roll ups.
  • Lay each roll up, seam side down, into the prepared casserole dish until you have filled the pan.
    Lasagna Roll Ups: A twist on classic lasagna www.momsdinner.net
  • Top the roll ups with the remaining marinara sauce. Sprinkle 1 cup mozzarella and ยฝ cup Parmesan cheese evenly over the top of the roll ups.

Baking

  • Cover the pan with foil and bake for 35 minutes.
  • Remove the foil and bake for an additional 10 minutes until the cheese is melted and bubbly.
  • Let the roll ups rest for 5-10 minutes before serving.
  • Serve 2 roll ups per person.

Recipe Tips and Notes:

MAKE AHEAD- You can prep these lasagna roll ups until it is time to put them in the oven. Cover with foil and place in the fridge for up to 2 days. Bake as directed, adding 5 minutes to the cook time to warm through.ย 
Did you make this recipe?Connect with me and let me know by commenting below!
Jump to Comments
Serving: 2roll ups | Calories: 804kcal | Carbohydrates: 47g | Protein: 42g | Fat: 50g | Saturated Fat: 23g | Polyunsaturated Fat: 4g | Monounsaturated Fat: 19g | Trans Fat: 0.003g | Cholesterol: 162mg | Sodium: 1665mg | Potassium: 801mg | Fiber: 4g | Sugar: 7g | Vitamin A: 1231IU | Vitamin C: 11mg | Calcium: 589mg | Iron: 4mg

Friday Gratitude -A Scavenger Hunt & Snuggles 4.5.18

April 6, 2018 by Susie Weinrich Leave a Comment

Easter eggs

I am just going to say this…I tried on swim suits this week. Yep…didn’t go well. I guess a year of recipe testing has me deep into stretchy pants and denial. It was a reality check to say the least.

Easter eggs

The bright side? I am super comfortable in my skin and I am super thankful that I have this gratitude journal to keep my mind on the positive things!

Here are a few highlights from my week: [Read more…]

Friday Gratitude- Jayhawks & Buzzfeed 3.30.18

March 30, 2018 by Susie Weinrich 2 Comments

KU Friends

What an amazing week it has been. Spring has sprung, KU is going to the final 4, I got to spend an evening in Lawrence with friends, and one of my favorite holidays is this weekend. I am feeling full of gratitude.

Here are some of my favorite moments from this week:

LHOP

Y’all I am so excited for this!

Every couple weeks or so my daughter and I will pick a book to read together at bedtime. We usually only read a couple chapters or a couple pages each night, depending on how long the day has been.

The next book we decided to read over the summer is ….drumroll please……The Little House on the Prairie series. EEEEKKKK!!! I am BUSTING!!! I think I might be more excited than Maddie!

Little House In The Big Woods

It was #lifegoals when I was little to live a life like Laura Ingalls Wilder. I would imagine myself carrying my lunch to school in a tin bucket, wearing a bonnet, and sleeping in beds made of straw . #Dreamy

You better believe any imaginary playing I did included living a “hard life” in the country doing “chores”. I would pretend that I lived in a log cabin with no running water or electricity and that horse and wagon (my bike) was my only mode of transportation. I even remember making a blanket out of big Sycamore leaves and pine needles…I literally pinned the leaves together in a blanket pattern with the pine needles.

My daughter laughs and says this sounds like her worst nightmare. I hope after we start the first book “Little House in the Big Woods” she will see the glamour of prairie days. HA! (doubt it!)

I am so grateful for the little moments at the end of the day to read with my daughter, especially when we read books I’m excited about.

Rock Chalk Jayhawk

This game had me biting my nails and sitting on the edge of my seat!

KU vs. Duke

  • KU 85
  • Duke 81

Rock Chalk!!โ™ฅโ™ฅ

University of Kansas Jayhawk

I LOVE watching KU play in the NCAA tournament… especially when they win!!! Final Four Baby!

A Night in Lawrence

I consider myself a lucky girl to still keep in touch with some pretty amazing friends from college. Every few years or so we try to all get together. I love that we all fall right back into the swing of things, like no time has past at all. I treasure these friendships, they fill me with ALL SORTS of gratitude.

This past week one of my college friends returned to our old stomping grounds to take her daughter on a campus tour of KU. I was so excited for the chance to 1. meet her beautiful and amazing 16 YEAR OLD daughter (I hope Maddie is just as wonderful as she is at 16!!!), and 2. spend some time with old friends.

KU Friends

We met at the beautiful new hotel right off of the KU campus called “The Oread”. What we really love about this hotel is that it sits on the land that, back in our college days, held the best, dirtiest, most run down, shack-of-a-bar called “The Crossing”. If you spent any time at KU in the 90’s, then you know what I’m talking about!

It was the meeting place for all my friends on EVERY warm Friday afternoon. You would finish class and then stroll to The Crossing for a cold pitcher of beer, a few games of pool, lots of Dave Matthews, and laughs with friends. Good Times!

Then, The Crossing

The Crossing

Now, The Oread

The Oread

You better believe we talked through all sorts of memories on Monday night. It was great sharing (the appropriate) stories with my friends daughter. Of course, in hopes that she will eventually choose KU and experience the amazing-ness that it is to be a Jayhawk!!!!!!!!

The thought of my friend touring KU with her daughter also had me feeling all the feels. I started to think about the day that John and I will take Maddie to tour KU and how excited and sad I will be. I thought about all the stories and memories I will want to share with her. I’m excited for that day… but also hoping that day never comes.

I was so grateful I had the chance to spend some time with old college friends this week, catching up and reminiscing. It filled my heart.

Friday Gratitude- March Madness & Dinner Al Fresco 3.23.18

March 23, 2018 by Susie Weinrich Leave a Comment

University of Kansas Jayhawk

My gratitude post this week is quick and to the point. I spent a lot of time this past week working on recipes, photography and some of the technical side of my website. It has been wonderful and I was able to crank out 5 RECIPE POSTS! That is a record for me, for sure. I loved every minute. It just didn’t leave a lot of minutes to write all the juicy details for this post.

Here are a few moments from this week that made my heart sing:

March Madness

KU vs. Seton Hall

  • KU 83
  • Seton Hall 79

Rock Chalk!โ™ฅโ™ฅUniversity of Kansas Jayhawk [Read more…]

  • « Previous Page
  • 1
  • …
  • 60
  • 61
  • 62
  • 63
  • 64
  • 65
  • Next Page »
Susie in the kitchen with an apron on getting ready to cook

Meet The Author:

Susie Weinrich is a professional recipe developer specializing in classic Midwest cooking, recently seen on Food Network's 100 Cooks. Her thoroughly tested recipes and step-by-step guides give home cooks real confidence in the kitchen.

YOU will feel like a huge success at dinner time with any of the simple recipes on Mom's Dinner! Read More

Helpful Meal Planning Resources

  • a table with white place settings and green garland
    Easy Meals for House Guests
  • a round table with a large family eating dinner
    30 Easy Meals for Large Family Vacations & Gatherings
woman owned small business certificate by Sertify

Amazing New Recipes

  • Scoop of broccoli cheese casserole coming out of a baking dish.
    Down Home Broccoli and Cheese Casserole
  • Close up of a fresh made fried pork tenderloin sandwich topped with onion rings, pickles, horseradish mayo and lettuce.
    Iowa Fried Pork Tenderloin Sandwiches
  • two kids jumping in a lake off the dock at sunset
    Dinners for a Week at the Lake House
  • Tuna Noodle Casserole in a white dish being spooned out of the baking pan
    Mom’s Tuna Noodle Casserole

Footer

^ back to top

About

  • Susie Weinrich
  • Privacy Policy
  • Accessibility Policy

Contact

  • Sign Up! for emails
  • Contact Me!
  • Join Me On YouTube

Recipes

  • Recipe By Category
  • Instant Pot Recipes
  • Dinner Recipes

Copyright ยฉ 2026 Mom's Dinner

Rate & Review This Recipe

Your vote:


A rating is required
A name is required
An email is required